# Preface
This tutorial is based on the "apifm-wxapi" module and teaches you how to quickly implement small program development, so you may need to understand the following knowledge points first:
["Creating HelloWorld Project"](https://www.yuque.com/apifm/doc/hezlrm)
["Use "apifm-wxapi" to quickly develop small programs"](https://www.yuque.com/apifm/doc/mdldsd)
["Register for free to open the backend and obtain an exclusive domain name"](https://www.yuque.com/apifm/doc/qr6l4m)
# Function description
The administrative district data in this case adopts the authoritative data published by the National Bureau of Statistics in 2017, and the area code is the national standard;
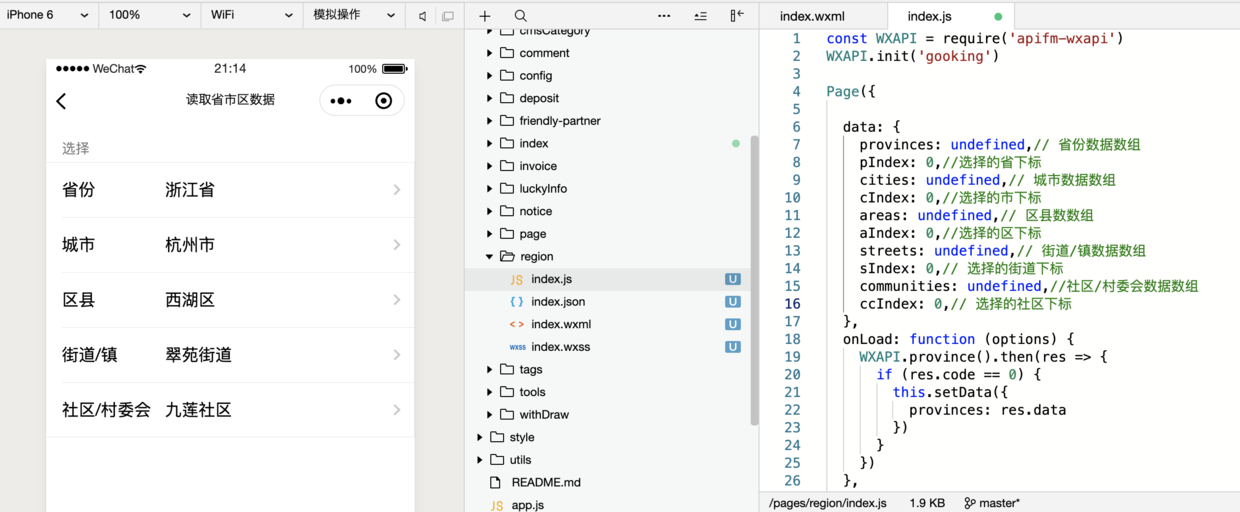
The mini program realizes 5-level linkage, realizing data linkage at the provincial/municipal/district/street/community and town/village committee levels;
# Mini program implementation
## Effect demonstration
## wxml code
```plain
Choose
Province
{{provinces[pIndex].name}}
city
{{cities[cIndex].name}}
Districts and counties
{{areas[aIndex].name}}
street/town
{{streets[sIndex].name}}
Community/Village Committee
{{communities[ccIndex].name}}
```
## js code
```plain
const WXAPI = require('apifm-wxapi')
WXAPI.init('gooking')
Page({
data: {
provinces: undefined,//province data array
pIndex: 0, //Selected provincial subscript
cities: undefined,//city data array
cIndex: 0, //Selected city index
areas: undefined,// Array of district and county numbers
aIndex: 0, //Selected area index
streets: undefined,//street/town data array
sIndex: 0,//Selected street index
communities: undefined,//community/village committee data array
ccIndex: 0,//Selected community index
},
onLoad: function (options) {
WXAPI.province().then(res => {
if (res.code == 0) {
this.setData({
provinces: res.data
})
}
})
},
provinceChange(e){
const index = e.detail.value
this.setData({
pIndex: index
})
const pid = this.data.provinces[index].id
WXAPI.nextRegion(pid).then(res => {
console.log(res)
if (res.code == 0) {
this.setData({
cities: res.data
})
}
})
},
cityChange(e){
const index = e.detail.value
this.setData({
cIndex: index
})
const pid = this.data.cities[index].id
WXAPI.nextRegion(pid).then(res => {
console.log(res)
if (res.code == 0) {
this.setData({
areas: res.data
})
}
})
},
areaChange(e){
const index = e.detail.value
this.setData({
aIndex: index
})
const pid = this.data.areas[index].id
WXAPI.nextRegion(pid).then(res => {
console.log(res)
if (res.code == 0) {
this.setData({
streets: res.data
})
}
})
},
streetChange(e){
const index = e.detail.value
this.setData({
sIndex: index
})
const pid = this.data.streets[index].id
WXAPI.nextRegion(pid).then(res => {
console.log(res)
if (res.code == 0) {
this.setData({
communities: res.data
})
}
})
},
communityChange(e){
const index = e.detail.value
this.setData({
ccIndex: index
})
const pid = this.data.communities[index].id
WXAPI.nextRegion(pid).then(res => {
console.log(res)
// It seems there are no subordinates
})
},
})
```
> WXAPI.init('gooking') This code links your mini program to your backend, where gooking is your exclusive domain name (please check the chapter about exclusive domain names in the preface);
>
_apifm-wxapi can obtain up to 5 levels of data, which is enough for practical applications (the same level of detail as the address system of a certain treasure)_
_In usual business scenarios, generally only level 2-3 is required. You can modify the above small program code according to your actual needs, using the principle of sufficiency and focusing on user experience! _
**Expansion:**
_WeChat has its own API interface for reading the delivery address. Use your brain and try to realize the integration and compatibility of WeChat's built-in reading of the user's delivery address and the address system of this case. I look forward to your work. _
Looking forward to your progress!
grateful!