# Preface
This tutorial is based on the "apifm-wxapi" module and teaches you how to quickly implement small program development, so you may need to understand the following knowledge points first:
["Creating HelloWorld Project"](https://www.yuque.com/apifm/doc/hezlrm)
["Use "apifm-wxapi" to quickly develop small programs"](https://www.yuque.com/apifm/doc/mdldsd)
["Register for free to open the backend and obtain an exclusive domain name"](https://www.yuque.com/apifm/doc/qr6l4m)
# Function description
Let you quickly understand the use of the json module of apifm-wxapi, and use this module to simply implement a "daily movement" small program;
A function similar to talking, you can write a sentence or emotion every day;
This example aims to describe the use of the json module in an easy-to-understand usage scenario, and does not discuss the actual application scenario of this case;
# Enable the "Json data storage interface" module
Log in to the "First Step" registration background, left menu --> Factory settings --> Module management
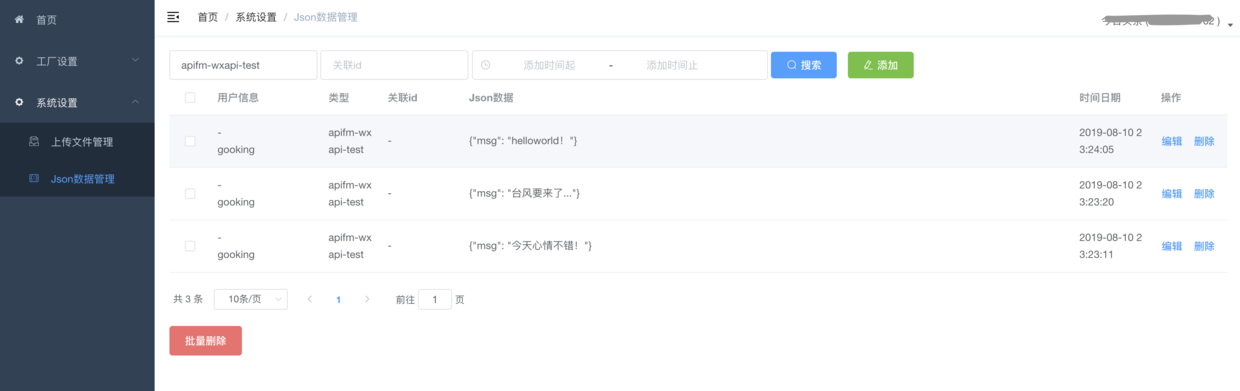
Find the "Json Data Storage Interface" module, click "Enable Module", then F5 to refresh the background interface, you will see the new menu:
"System Settings" --> "Json Data Management";
# Mini program implementation
## Effect demonstration

## wxml code
```plain
Use the json interface to create a daily talk caseMovement in the past:
{{ item.jsonData.msg }}
{{ item.dateAdd }}Delete```
## js code
```plain
const WXAPI = require('apifm-wxapi')
WXAPI.init('gooking')
Page({
data: {
inputvalue: undefined,
jsonList: undefined,
},
onLoad: function (options) {
},
onShow: function () {
this.jsonList()
},
goRegist() {
wx.navigateTo({
url: '/pages/auth/index'
})
},
inputChange(e) {
this.data.inputvalue = e.detail.value
},
jsonList(){
const loginToken = wx.getStorageSync('loginToken')
if (!loginToken) {
wx.showToast({
title: 'Please log in first',
icon: 'none'
})
return
}
WXAPI.jsonList({
token: loginToken.token,
type: 'apifm-wxapi-test'
}).then(res => {
console.log(res)
if (res.code == 0) {
this.setData({
jsonList: res.data
})
} else {
this.setData({
jsonList: null
})
wx.showToast({
title: res.msg,
icon: 'none'
})
}
})
},
jsonSet() {
const loginToken = wx.getStorageSync('loginToken')
if (!loginToken) {
wx.showToast({
title: 'Please log in first',
icon: 'none'
})
return
}
if (!this.data.inputvalue) {
wx.showToast({
title: 'Content cannot be empty',
icon: 'none'
})
return
}
WXAPI.jsonSet({
type: 'apifm-wxapi-test',
token: loginToken.token,
content: '{"msg": "' + this.data.inputvalue +'"}'
}).then(res => {
console.log(res)
if (res.code == 0) {
wx.showToast({
title: 'Added successfully',
icon: 'success'
})
this.setData({
inputvalue:null
})
this.jsonList()
} else {
wx.showToast({
title: res.msg,
icon: 'none'
})
}
})
},
jsonDelete(e){
const loginToken = wx.getStorageSync('loginToken')
const id = e.currentTarget.dataset.id
WXAPI.jsonDelete(loginToken.token, id).then(res => {
console.log(res)
wx.showToast({
title: 'Delete successfully',
icon: 'success'
})
this.jsonList()
})
}
})
```
> WXAPI.init('gooking') This code links your mini program to your backend, where gooking is your exclusive domain name (please check the chapter about exclusive domain names in the preface);
>
# Summary
This case mainly uses the following three methods of apifm-wxapi:
```plain
WXAPI.jsonSet(Object)
WXAPI.jsonList(Object)
WXAPI.jsonDelete(token, id)
```
**For more detailed parameter usage and more advanced advanced usage methods, please refer to the API interface documentation: **
["api interface document"](#)
_More usage methods about apifm-wxapi: _
["apifm-wxapi Instructions for Use"](https://github.com/gooking/apifm-wxapi/blob/master/instructions.md)
_Download the Demo code of this case: _
["apifm-wxapi using Demo program"](https://github.com/gooking/apifm-wxapi-demo)
Looking forward to your progress!
grateful!