# Register and open a mini program account
[https://mp.weixin.qq.com/](https://mp.weixin.qq.com/)
Choose the identity of "Enterprise" or "Individual Industrial and Commercial Household" according to your actual situation, and register a mini program account
**Mall mini programs do not support individual users, so you must choose enterprise or self-employed**
Get access to your own mini program**appid and secret information**, save it, it will be used below
["How to check the APPID of my mini program? Where can I check the APPID of my mini program? 》](https://jingyan.baidu.com/article/642c9d340305e3644a46f795.html)
You need to set the legal domain name of the mini program, otherwise the development tool will run normally and the data will not be visible when accessed on a mobile phone:
"[Set the legal server domain name of the mini program](https://www.yuque.com/apifm/doc/tvpou9)"
# Register and open a backend account
[https://admin.it120.cc/](https://admin.it120.cc/)
Register for free and open a new backend, then log in. The home page after logging in, **Please note your exclusive domain name**, will be used later
Left menu "Factory settings" --> "Data Clone" --> "Clone other people's data to me"
Fill in the other party’s merchant ID **951**
Click "Clone Now". After the cloning is successful, F5 refreshes the background.
## Configure mini program APPID/SECRET
Left menu, platform management, WeChat Mini Program, fill in the appid and secret obtained in the previous step.
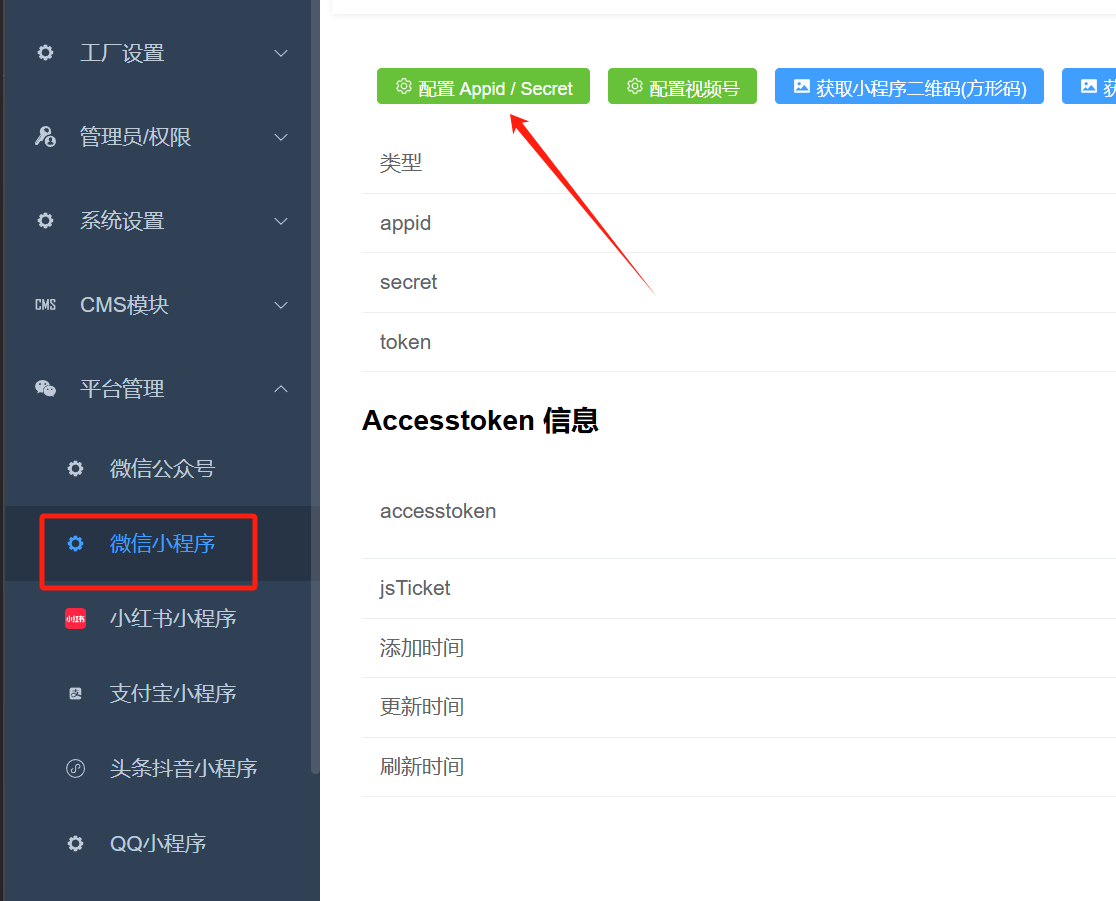
**This step is very important! ! !**
If it is not configured correctly, opening the mini program in the following steps will not allow you to connect to your backend.
## Configure WeChat payment
Left menu, system settings --> Online payment configuration, fill in your own WeChat payment information
# Download and install development tools
[https://developers.weixin.qq.com/miniprogram/dev/devtools/download.html](https://developers.weixin.qq.com/miniprogram/dev/devtools/download.html)
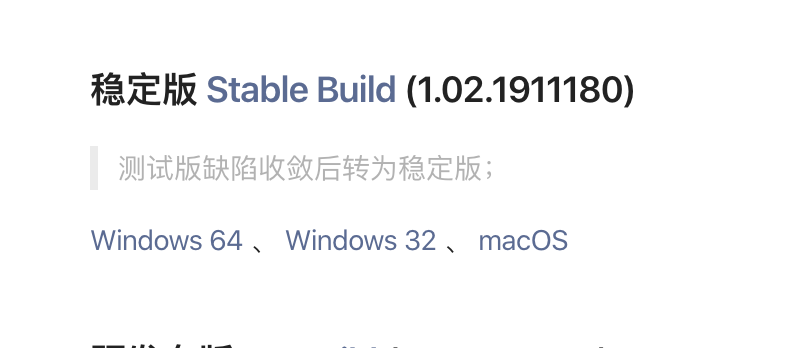
According to your own operating system, download the latest stable version and complete the installation after the download is complete.
# Download the mini program source code
[https://github.com/EastWorld/wechat-app-mall](https://github.com/EastWorld/wechat-app-mall)
Or download from the code cloud mirror, which will be faster:
[https://gitee.com/javazj/wechat-app-mall](https://gitee.com/javazj/wechat-app-mall)
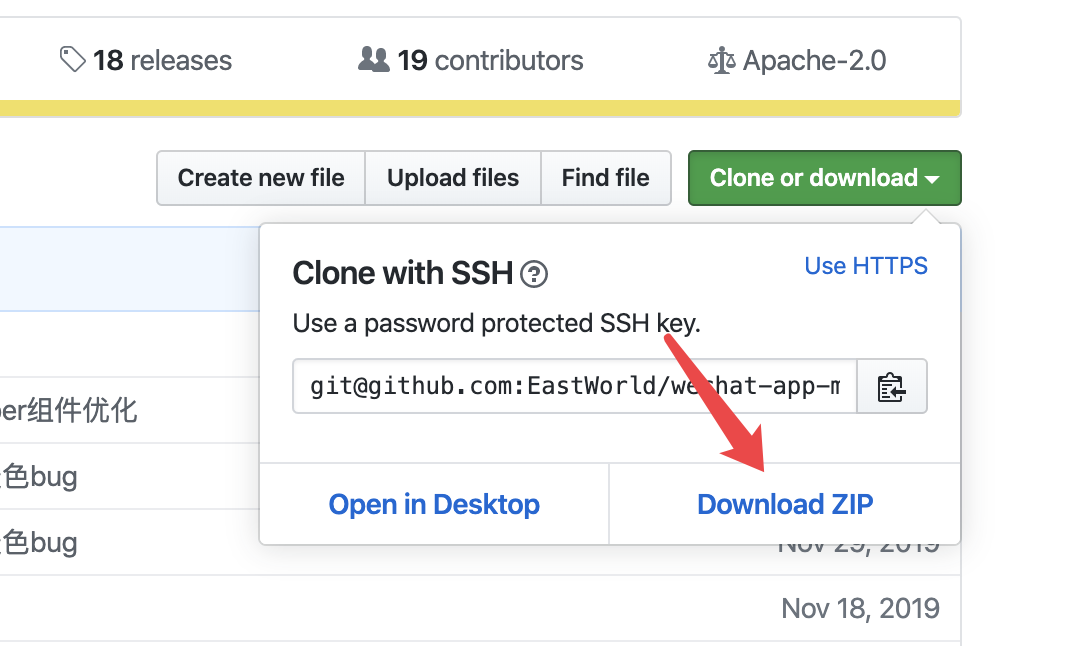
Download the latest mini program source code. The download is a zip compressed package. Please unzip it.
# Run the mini program to see the effect
Double-click to run the small program development tool installed in the first step and open it to see the effect.
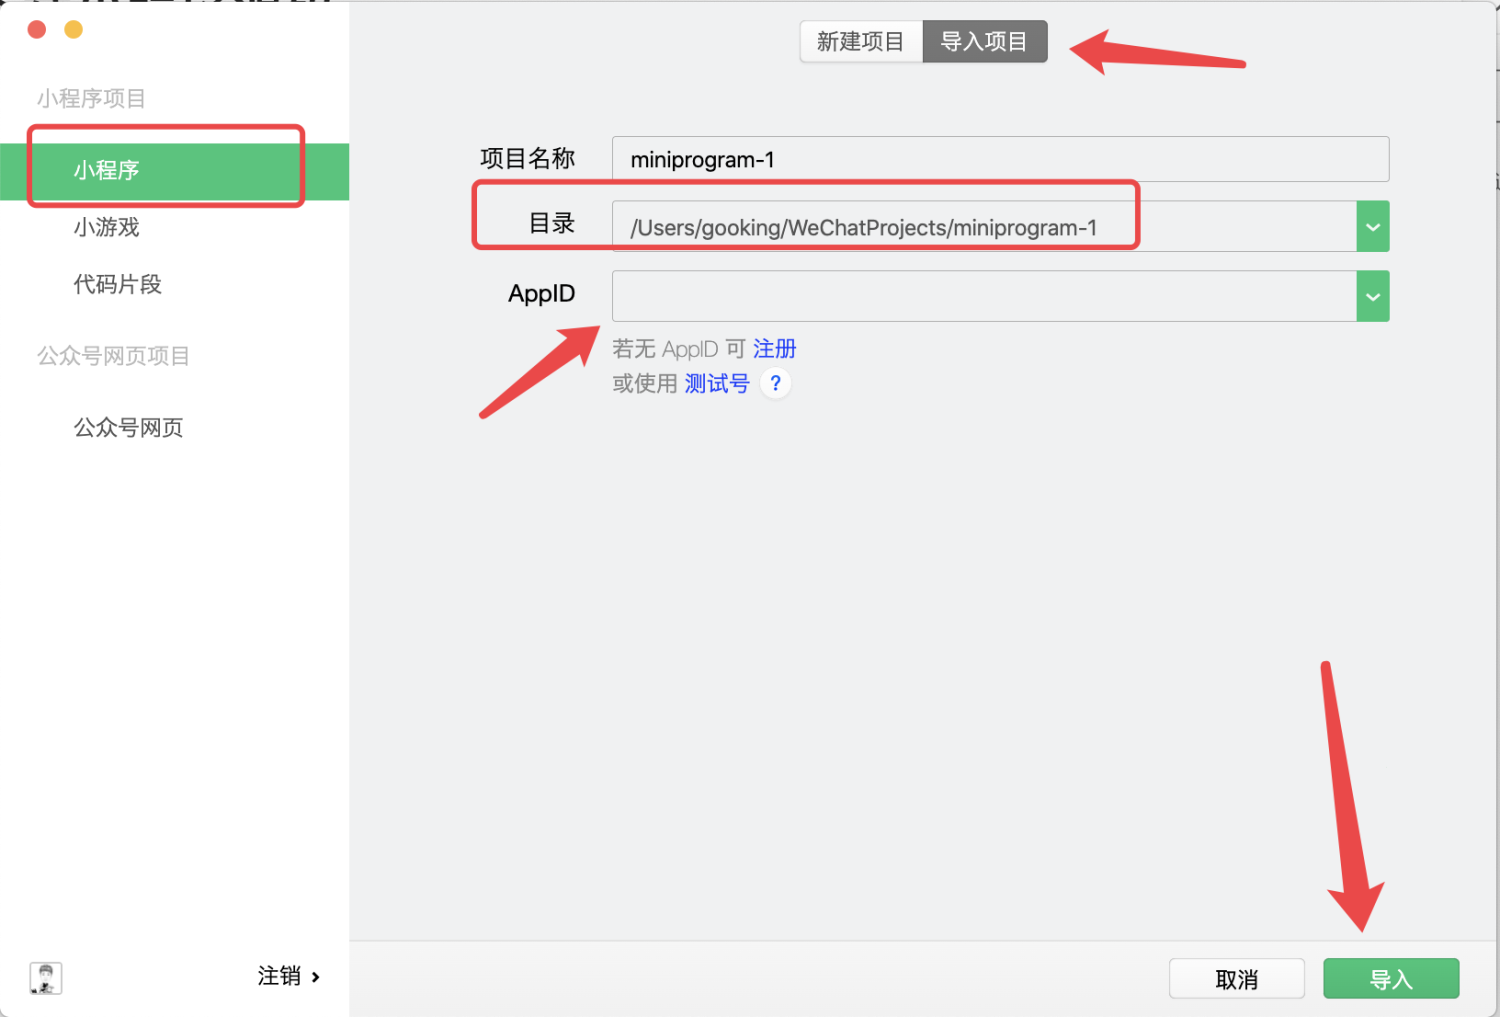
Import the project here, and select the directory where the applet code you downloaded and unzipped in "Step 2" is located.
**APPID must be changed to the APPID of your own mini program****
****APPID must be changed to the APPID of your own mini program****
****APPID must be changed to the APPID of your own mini program**
Then click the import button
["How to check the APPID of my mini program? Where can I check the APPID of my mini program? 》](https://jingyan.baidu.com/article/642c9d340305e3644a46f795.html)
# Configure docking with your own backendIn the development tool, change the subDomain in config.js to your own exclusive domain name, and press ctrl + s to save.
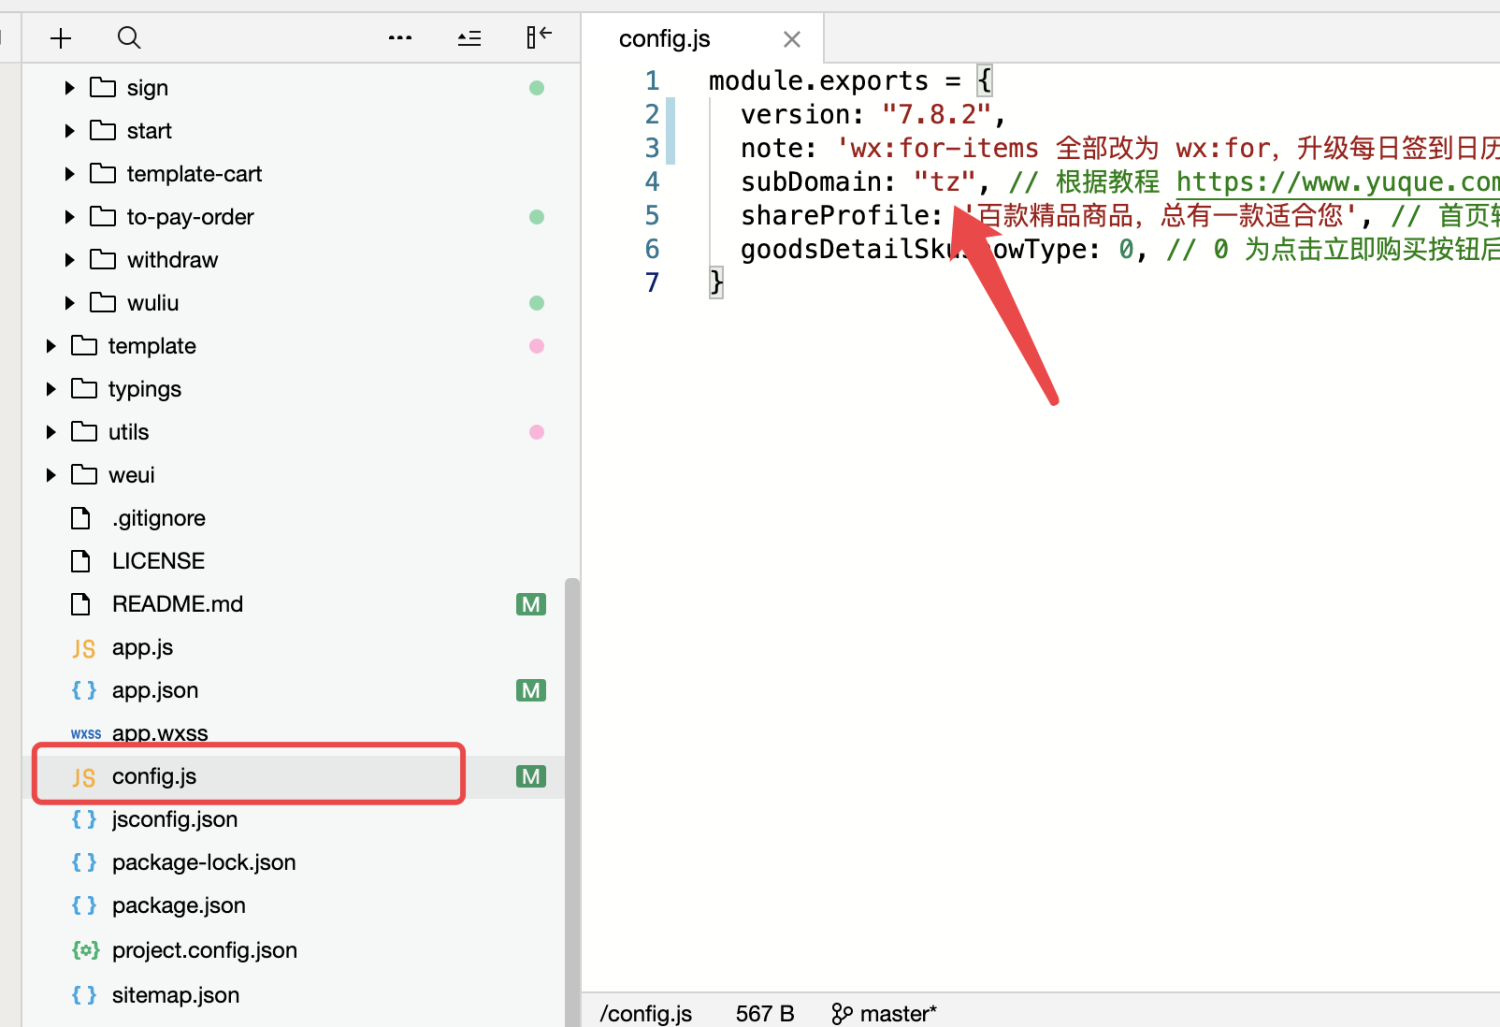
["How to view your own subDomain"](https://www.yuque.com/apifm/doc/qr6l4m)# System parameter settings
## Order payment uses balance
+ parameter type switch type
+ parameter nameorder_pay_user_balance## Start a recurring subscription order
+ parameter type switch type
+ parameter nameorderPeriod_open## Whether to display points for signing in
+ parameter type switch type
+ parameter nameshow_score_sign## Whether to display the points gift growth value
+ parameter type switch type
+ parameter nameshow_score_exchange_growth## Whether to display points coupons to give points
+ parameter type switch type
+ parameter nameshow_quan_exchange_score## Whether to display third-level distribution
+ parameter type switch type
+ parameter nameshow_3_seller## How to display products on the search page
+ Parameter type text type
+ parameter namegoods_search_show_type
+ Description1 means 1 product in a row; 2 means 2 products in a row## Whether to display purchase updates
+ parameter type switch type
+ parameter nameshow_buy_dynamic## Whether to display product sales
+ parameter type switch type
+ parameter nameshow_seller_number## Whether to enable order recycling
+ parameter type switch type
+ parameter namerecycle_open## Whether to enable CPS
+ parameter type switch type
+ parameter namecps_open## Specify the mini program payment interface
Mini program payment uses official WeChat payment by default. If you need to use other payment methods (provided that a new payment method is set in the background system settings -> online payment), you can specify the payment interface by setting system parameters:
+ Parameter type text parameter
+ parameter namewxpay_api_url+ parameter value/pay/wx/wxapp## Shipping address province and city level
+ Parameter type text parameter
+ Parameter name shipping_address_region_level
+ Parameter value: fill in 3 for provinces and cities, fill in 4 for streets in provinces and cities
## Whether adding a delivery address requires selecting positioning
+ parameter type switch type
+ Parameter name shipping_address_gps
+ Parameter value: Whether to select positioning on the map
## Is it necessary to conduct user real-name authentication before placing an order?
+ parameter type switch type
+ parameter name needIdCheck
## Add/modify the delivery address, whether real-name verification is required
+ parameter type switch type
+ Parameter name shipping-address-idcard-check
# Other configurations
##Backend configuration
["**WeChat Mini Program live broadcast tutorial**"](https://www.yuque.com/apifm/doc/ucgcnw)
## The order details interface displays the write-off QR code
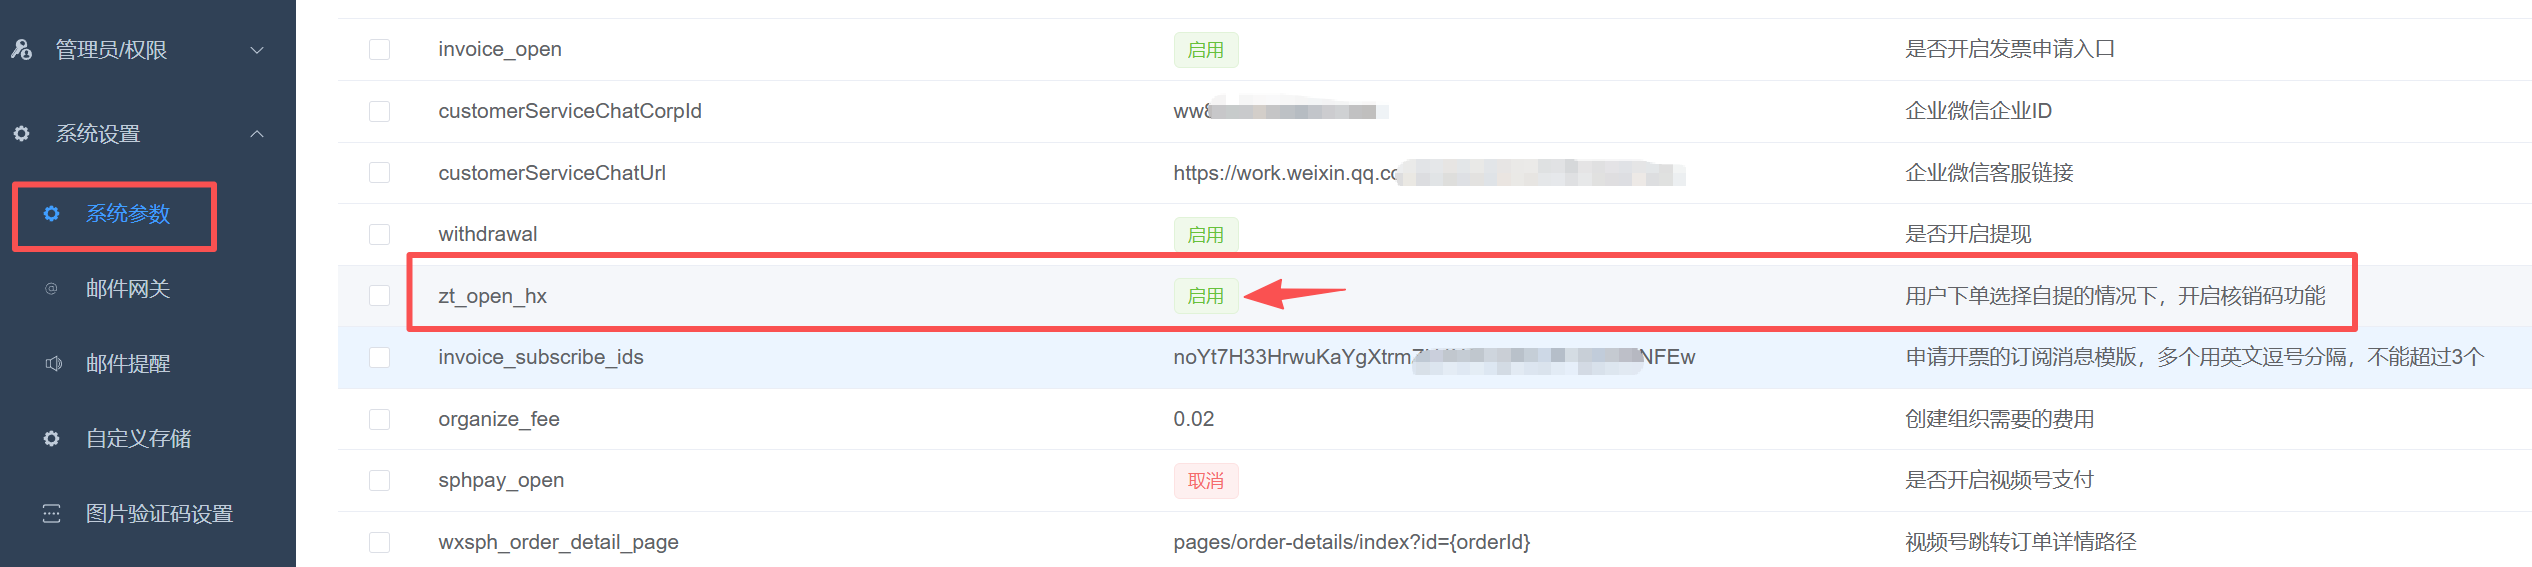
The write-off function is enabled in the background. After an order is placed in the mini program, the self-picked order will be automatically assigned a write-off code.
## Enable scan code write-off function
Backstage left menu "System Settings" --> "System Parameters", add a "**text type**" parameters:
Parameter encoding, fill inorder_hx_uidsParameter value, fill in the user number that has the authority to write off (the user number in the user management on the left menu is a string of numbers), if there are multiple user numbers, please separate them with commas.
If you want to enable store management authentication, you also need to follow the following tutorial:
[https://www.yuque.com/apifm/doc/sux6e7](https://www.yuque.com/apifm/doc/sux6e7)
## Purchase updates on the home page
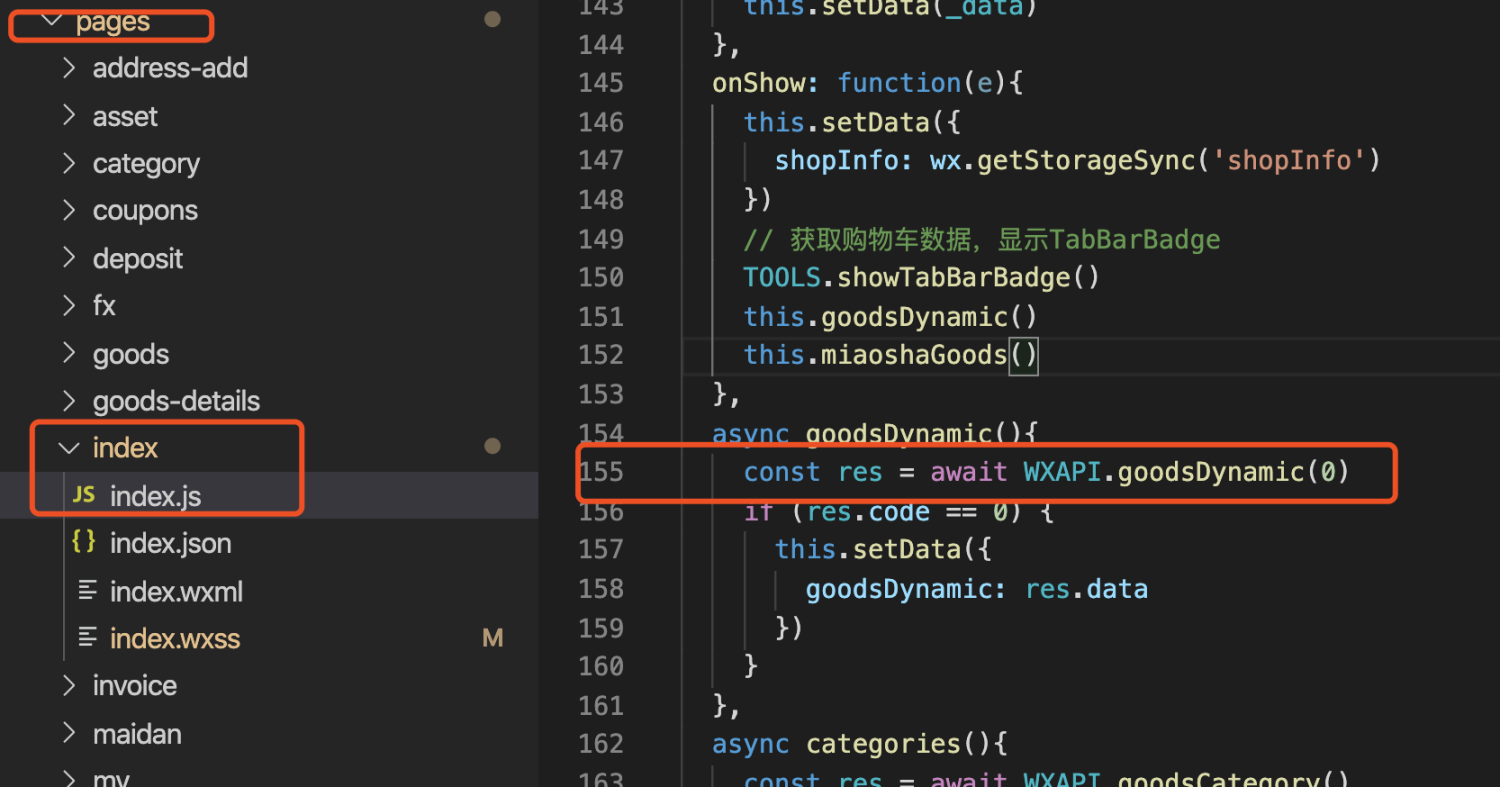
Parameters:
1. 0 As long as the user places an order, the purchase status will be recorded;
2. 1 The user must pay for the order before the purchase information will be generated;
How to delete dynamic data:
["**How to delete dynamic data of commodity transactions**"](https://www.yuque.com/apifm/doc/iivgc8)
## When placing an order, specify that the order requires the use of a delivery plug-in
The merchant has its own delivery person/rider, and when delivering by itself, it can be combined with the merchant's delivery plug-in: [https://www.it120.cc/help/ozughe.html](https://www.it120.cc/help/ozughe.html)
If you need to make an order and need it to be delivered by the merchant, then when placing an order on the mini program, specify that the order needs to be delivered:
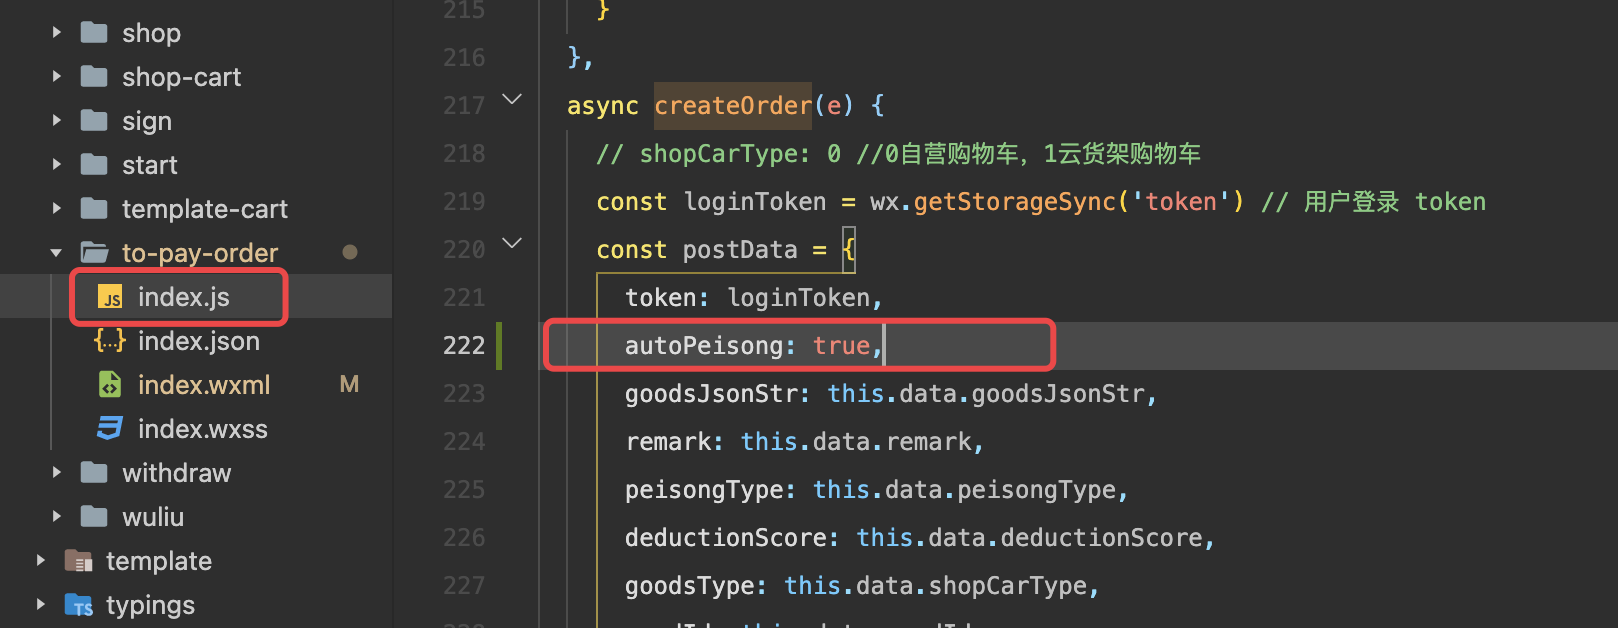
Add parameters when placing an order: `autoPeisong:true` That’s it
## Enable cash on delivery
First, you need to configure the backend to support the front-end creation of cash on delivery orders:
[https://www.yuque.com/apifm/doc/hagquy](https://www.yuque.com/apifm/doc/hagquy)
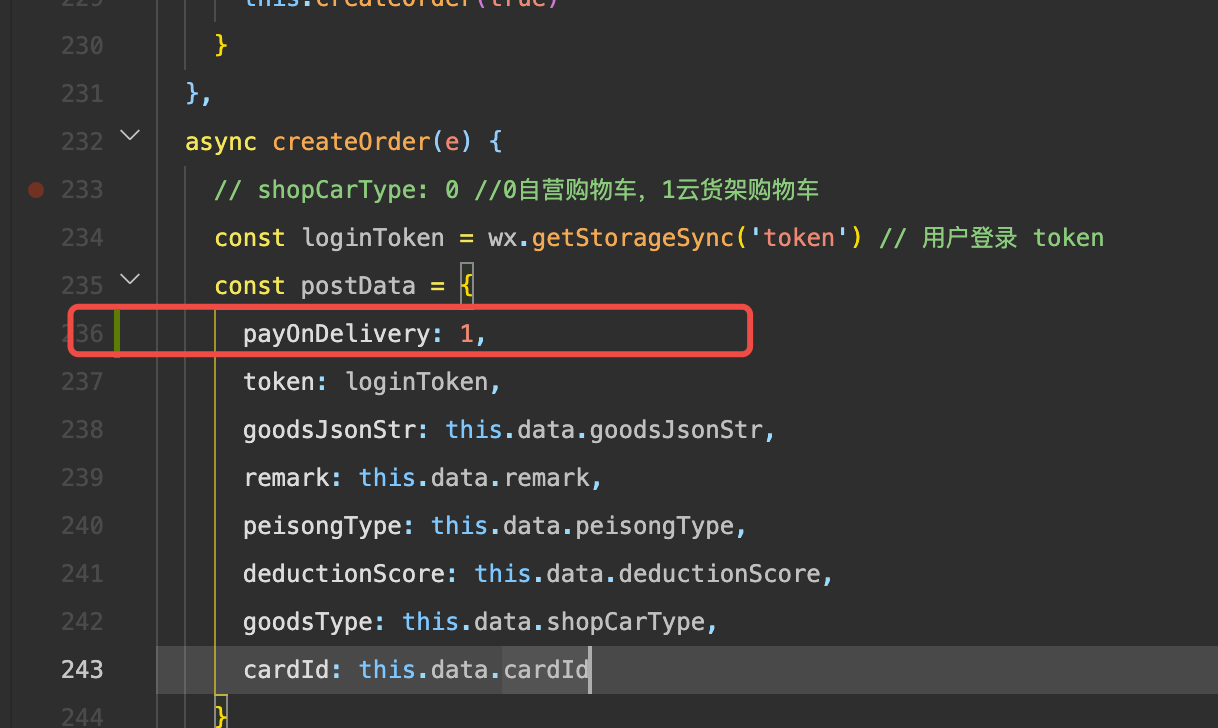
Open the page: `pages/to-pay-order/index`
Add parameters when creating an order: `**payOnDelivery: 1**`
## The page automatically pops up a dialog box for editing avatar and nickname.
+ In the onload method of the js file of the corresponding page, add the code `getApp().initNickAvatarUrlPOP(this)`
+ At the bottom of the wxml file of the corresponding page, add the code ``
+ The default is to pop up 3 seconds after entering the page. If you need to modify this time, search for the `initNickAvatarUrlPOP` method in the `app.js` file and change `3000` inside to the time you need.
## Customer service configuration
In `config.js`, `customerServiceType` can be configured to use mini program customer service or enterprise WeChat customer service, just select according to the instructions;
At the same time, go to the [https://mp.weixin.qq.com/](https://mp.weixin.qq.com/) left menu, click on customer service, and enable the corresponding customer service mode. If you choose enterprise WeChat customer service, you need to bind your enterprise ID. See the tutorial for details:
["How to use the mini program customer service system"](https://www.yuque.com/apifm/doc/wiwpz4)
At the same time, in the `apifm` background, on the left side, go to System Settings - System Parameters, modify your own corporate ID and customer service link:

#Backend configuration tutorial
## How to set the startup graph
In the left menu "System Settings" --> "Banner Management", add or modify images of type app;
App-type pictures will be displayed when you open the mini program for the first time. You can upload as many pictures as you need;
## The top of the homepage is changed to display only the title, without the search bar.
In the `pages/index/index.json` file, delete `"navigationStyle": "custom"`, and also delete the comma in the previous line.
In the `pages/index/index.wxml` file, delete `...`Entire block of code
## Modify the applet name
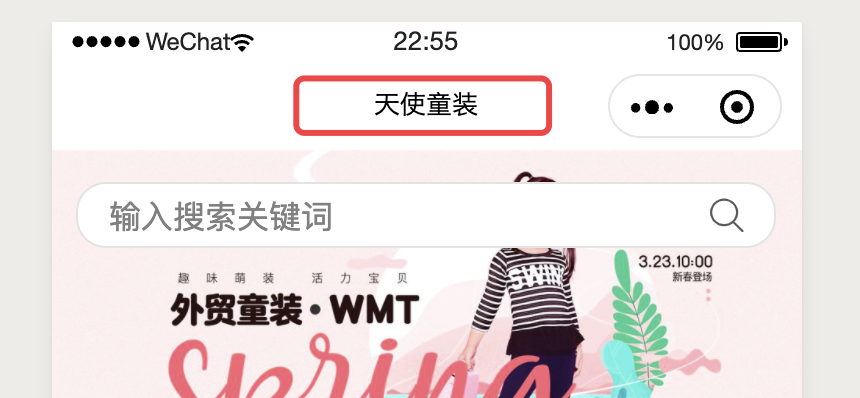
left menu "System Settings" --> "System Parameters", just modify the parameter numbered mallName;
## How to modify the sharing copy
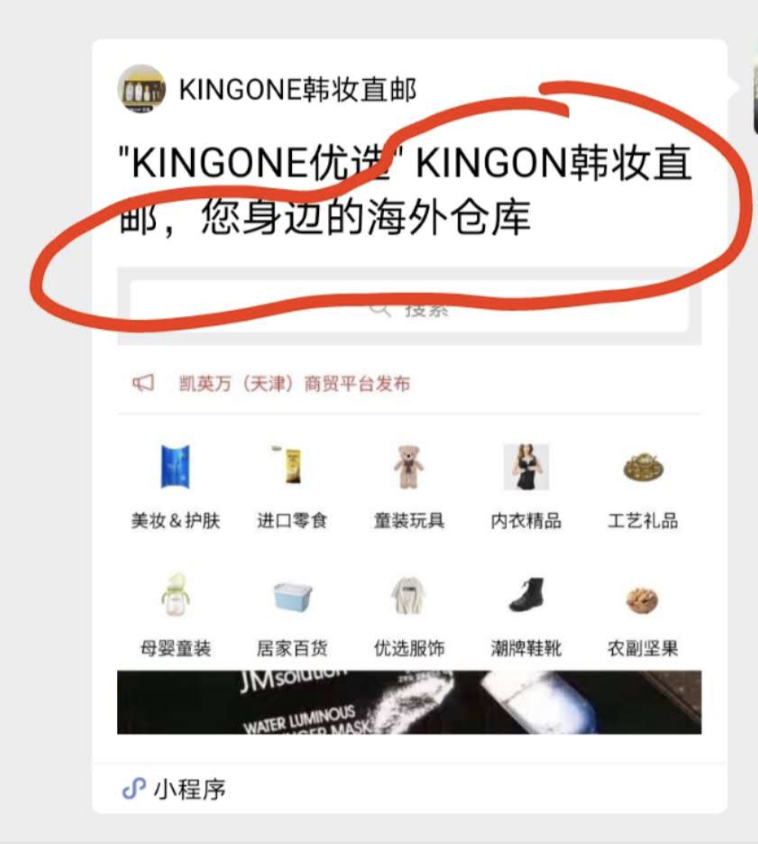
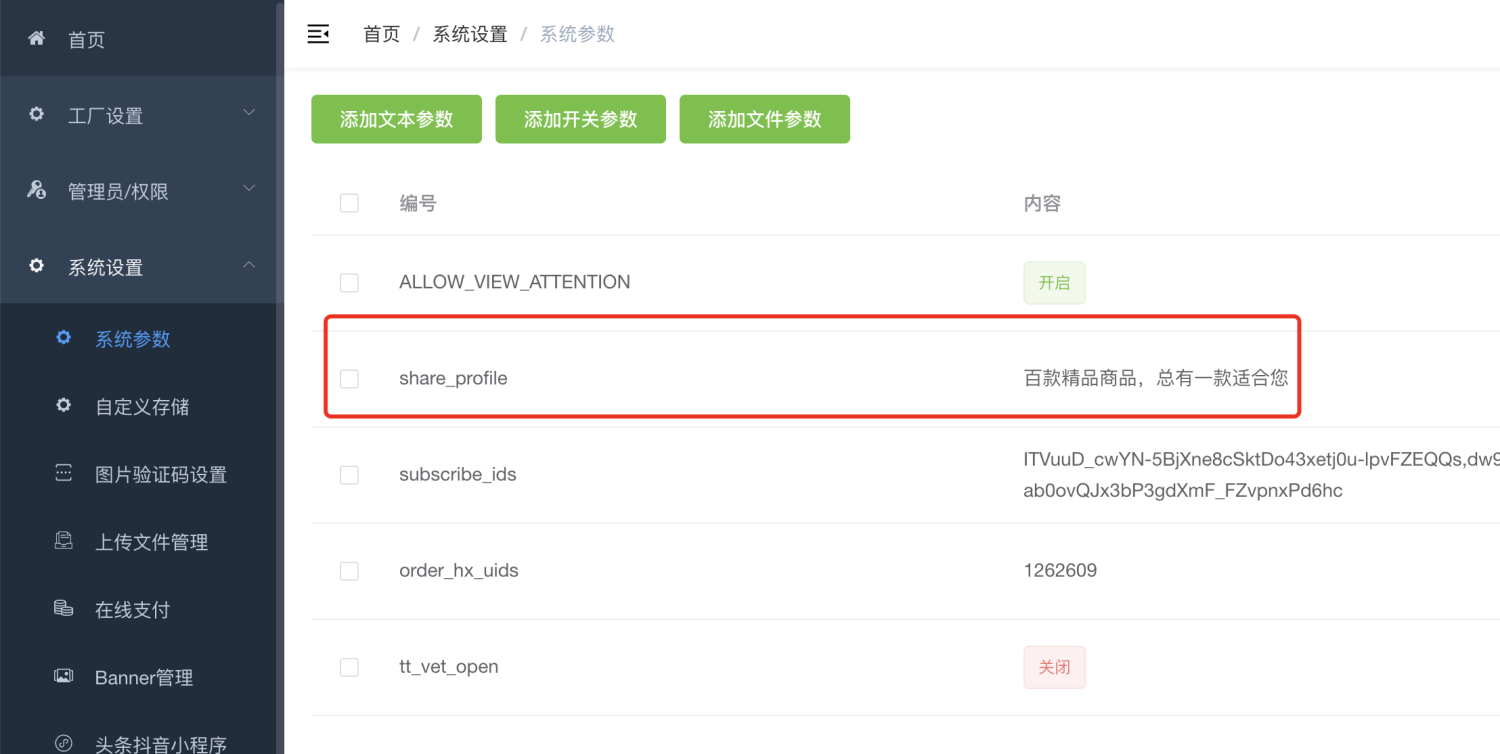
In the left menu "System Settings" --> "System Parameters", add a text type parameter:share_profile
## How to set up the homepage carousel image
In the left menu "System Settings" --> "Banner Management", add or modify images of type index;
Images of index type will be displayed in the carousel position on the home page;
## How to publish products
[https://www.yuque.com/apifm/doc/xers4q](https://www.yuque.com/apifm/doc/xers4q)
## How to add links to the homepage carousel image
### Click to open a product
1. First find the product number you need to open:
Left menu, "Mall Management" --> "Product Management", the number in the first column after opening is the product number;
2. Add jump links in banner management:
Left menu, "System Settings" --> "Banner Management", edit, fill in the link address:/pages/goods-details/index?id=1234
**Change 1234 to the product number you want to open.**
****
### Click to open the product list of a certain category
1. View the category management in the background and find the category number and category name:
On the left menu, "Mall Management" --> "Product Classification", after opening, just the numbers and names in the first column;
2. Add jump links in banner management:
Left menu, "System Settings" --> "Banner Management", edit, fill in the link address:/pages/goods/list?categoryId=category number&name=category name
****
### Click to enter the distribution center
For the link address in banner management, fill in:/pages/fx/apply-status## How to use video for product details header image
Please follow these steps:
1. Left menu, Factory settings, Module management, enable module "Video on demand transcoding”, then F5 refreshes the background;
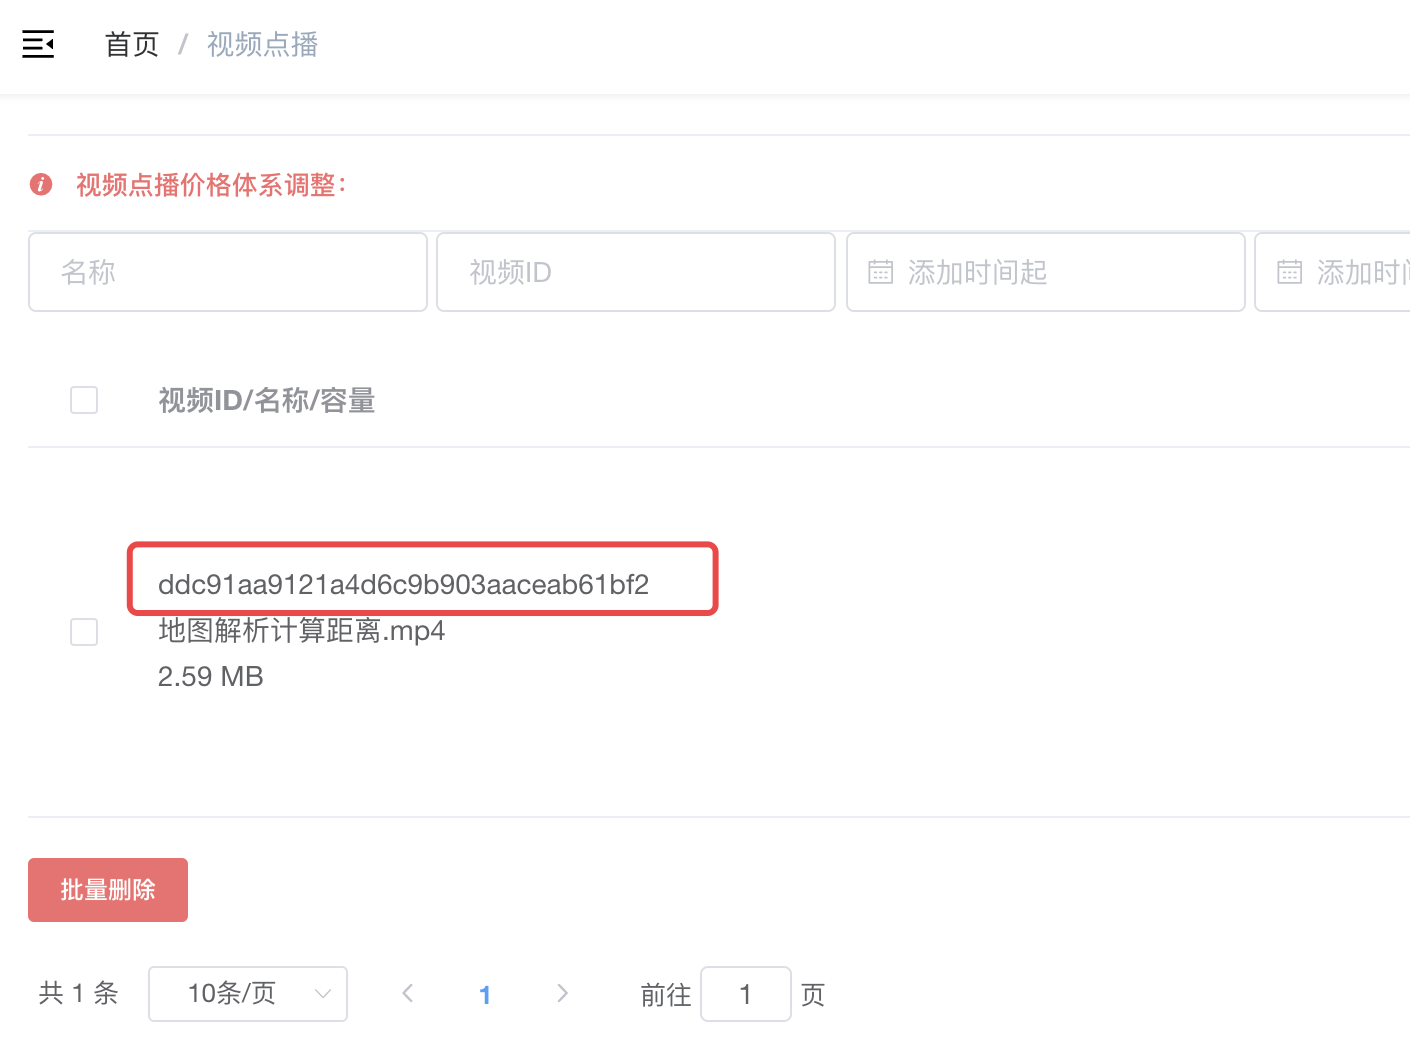
2. Left menu, video on demand, upload your video and record**Video ID**, as shown below:
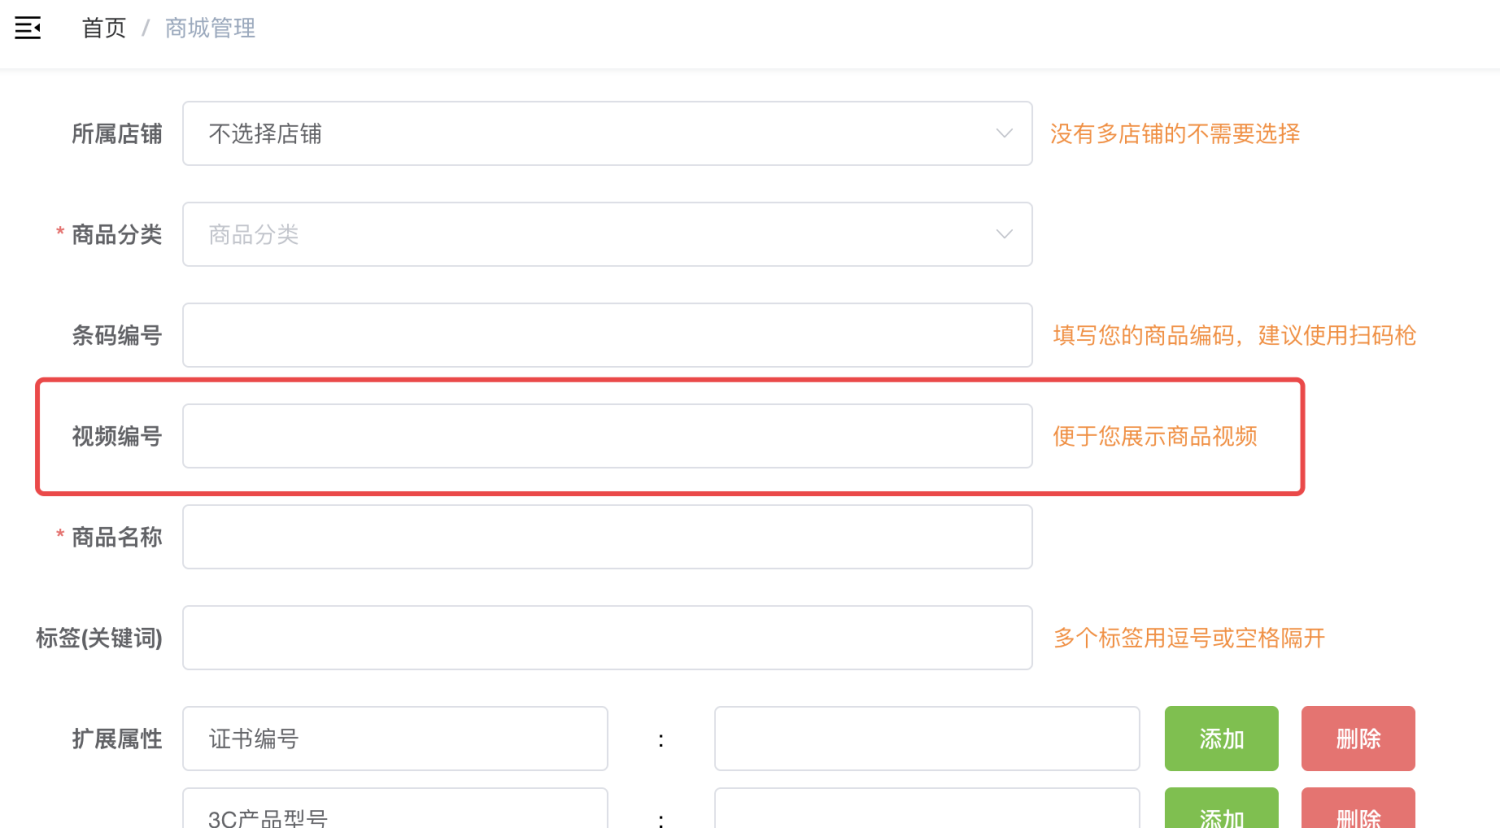
3. When publishing/editing products, just fill in the video ID above in the video number field:
## Configure subscription message template number
Left menu "System Settings" --> "System Parameters", the modification number issubscribe_idsThat parameter is enough (modify it if it exists);
| Subscription account template ID, multiple separated by commas in English | |
| :--- | --- |
## About Us
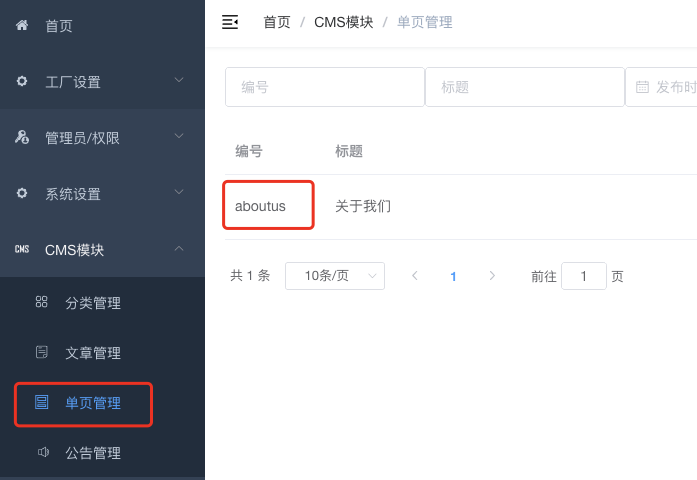
Log in to the backend, go to the left menu "CMS Module" --> "Single Page Management", add a number **aboutus** articles are sufficient.
## Help center
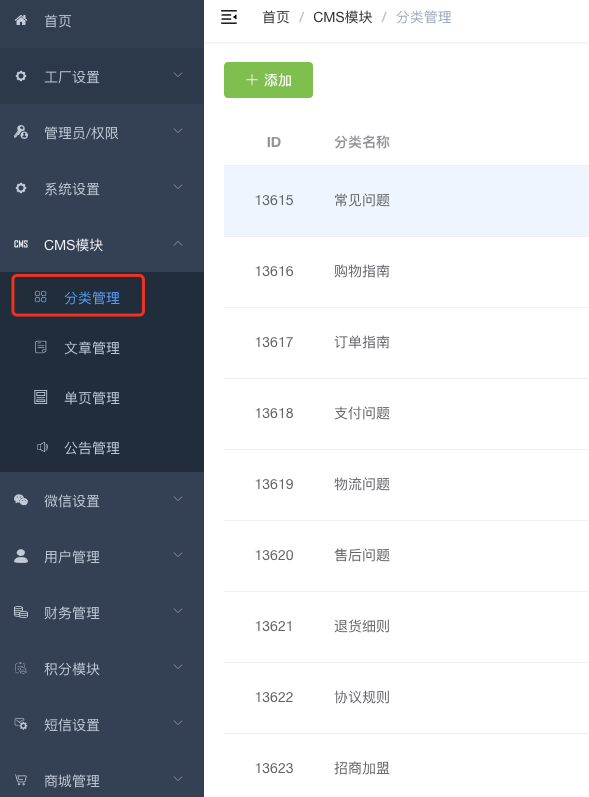
When adding a category, fill in the type: qa
Then in "Article Management", publish the corresponding article under the corresponding category.
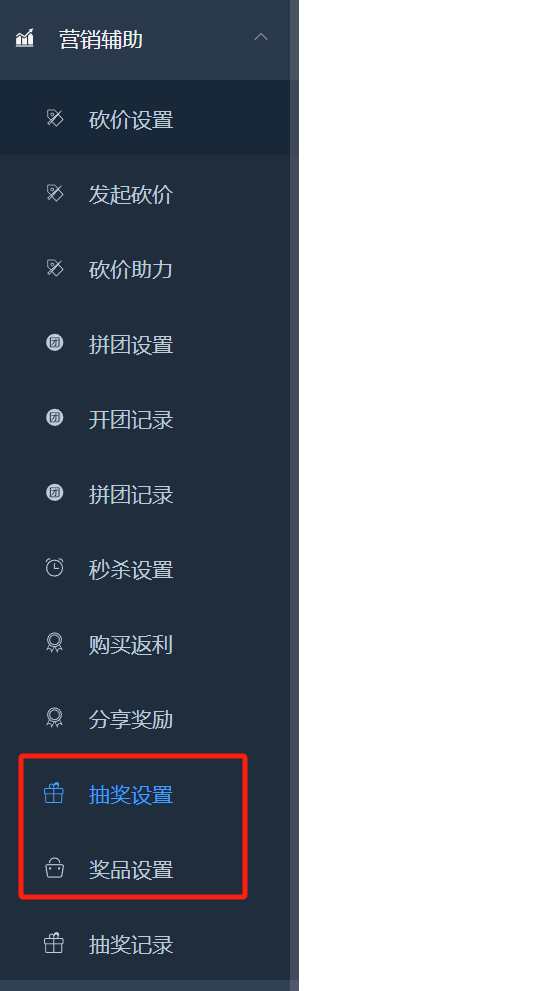
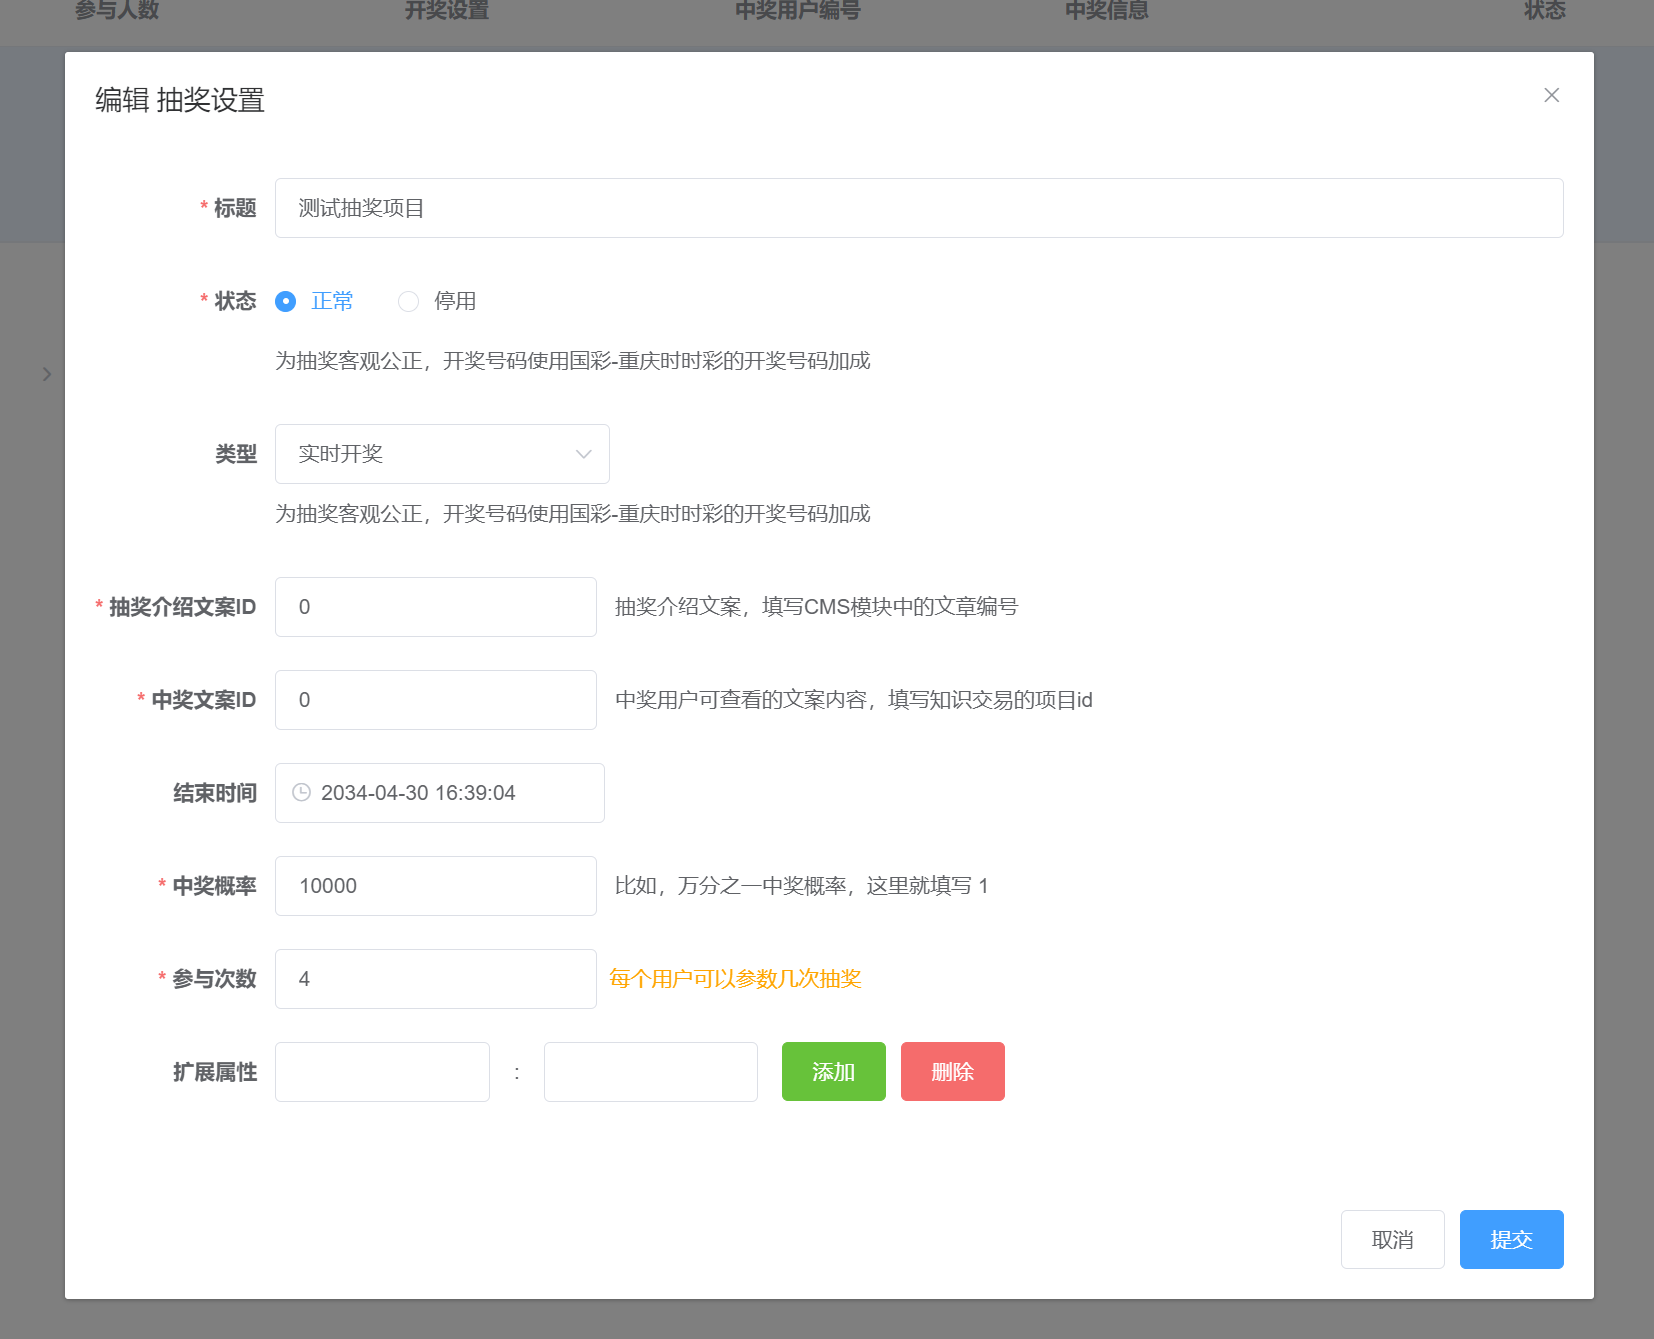
## Lucky draw on the home page
### Add a lottery setting
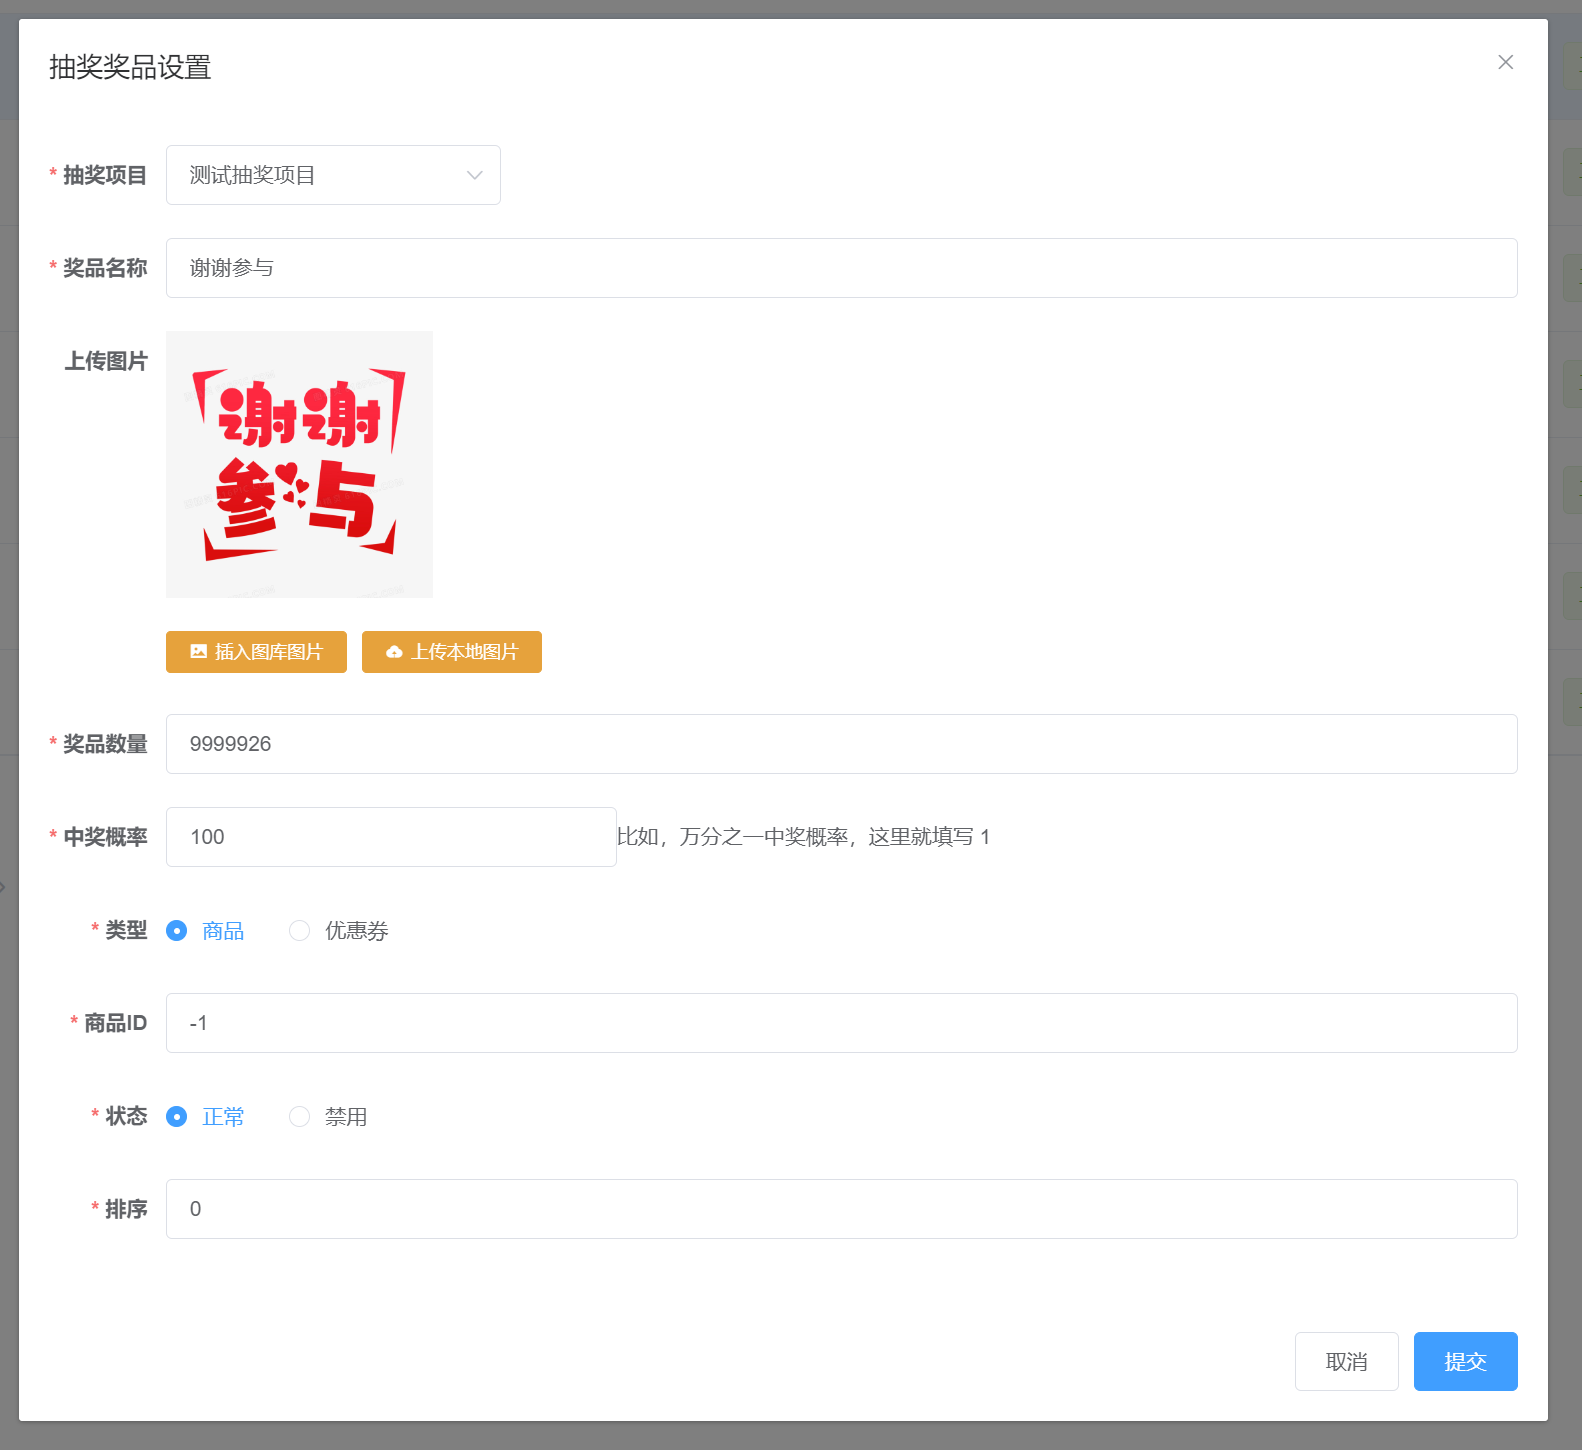
### Add lottery products (must and can only add 7 items)
### Set the pop-up lottery picture on the homepage
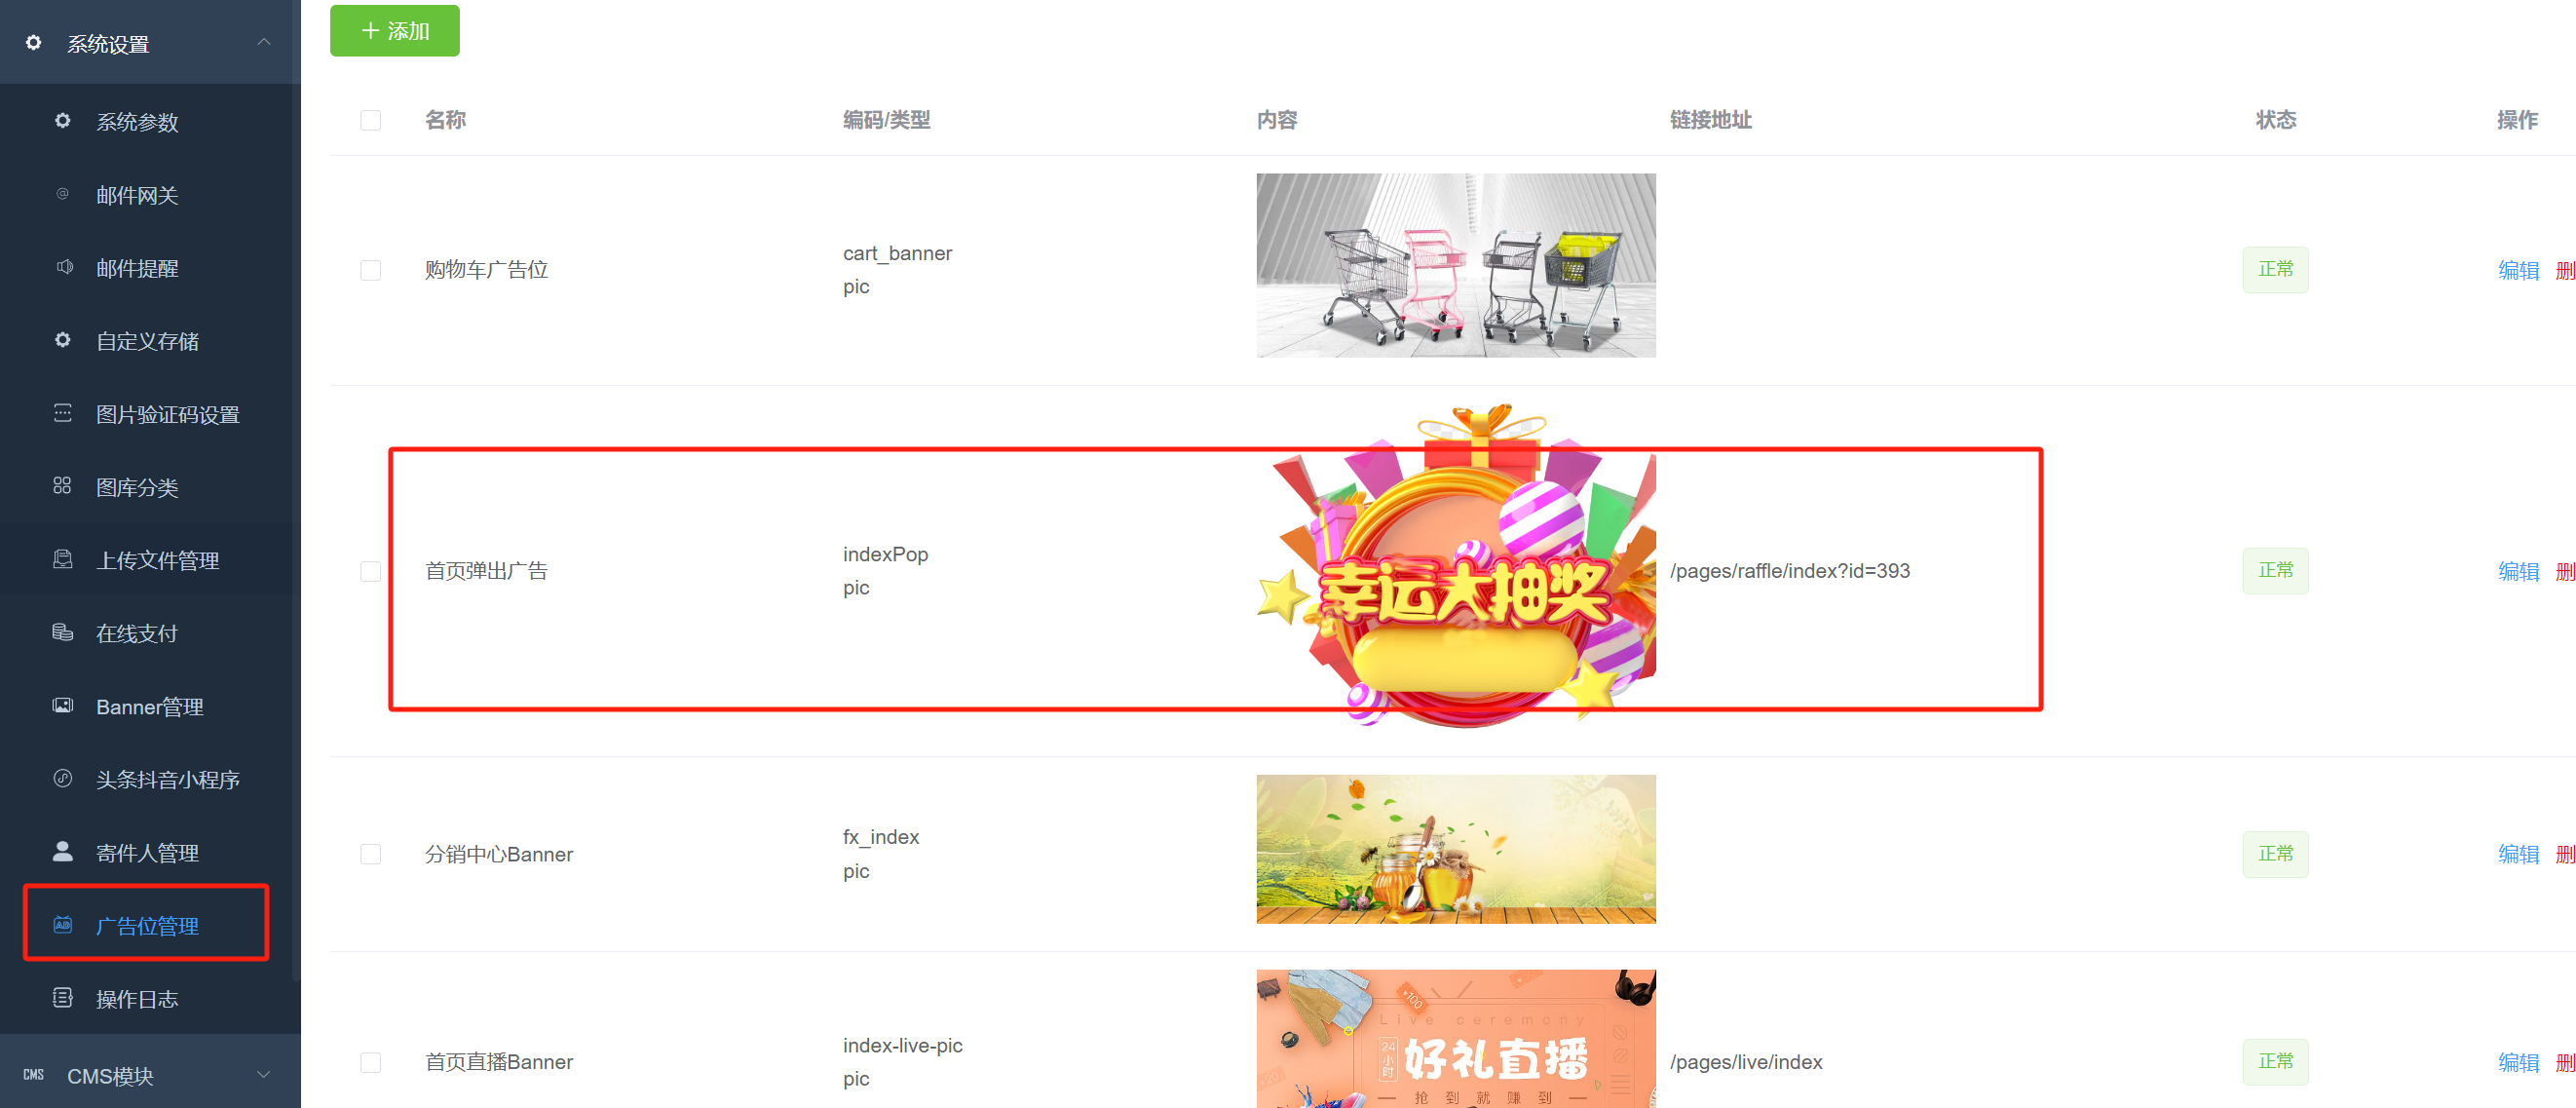
+ Use `indexPop` for ad slot number
+ Fill in the link address `/pages/raffle/index?id=393`, where 393 is the ID of the lottery setting you added in the previous step
# Launch mini program
1. Upload the code to the WeChat server
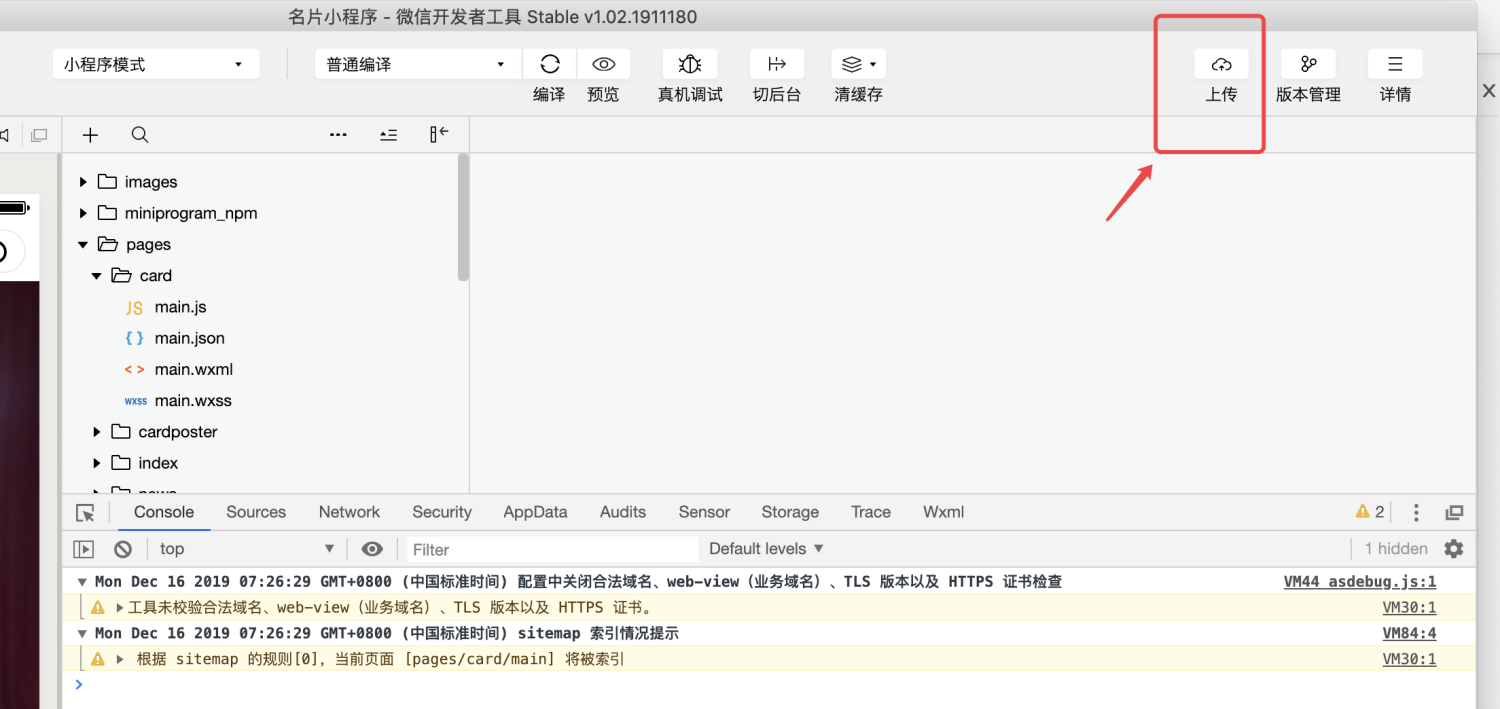
2. Submit for review
Log in to the mini program merchant backend in the "first step", go to "Version Management" on the left menu, find the mini program version you just uploaded, and click Submit for WeChat review. Once approved, your mini program can be officially released.
Things to note:
**Submit review interface,**`**Mini program order center path**`**Be sure to fill in: pages/order-list/index**
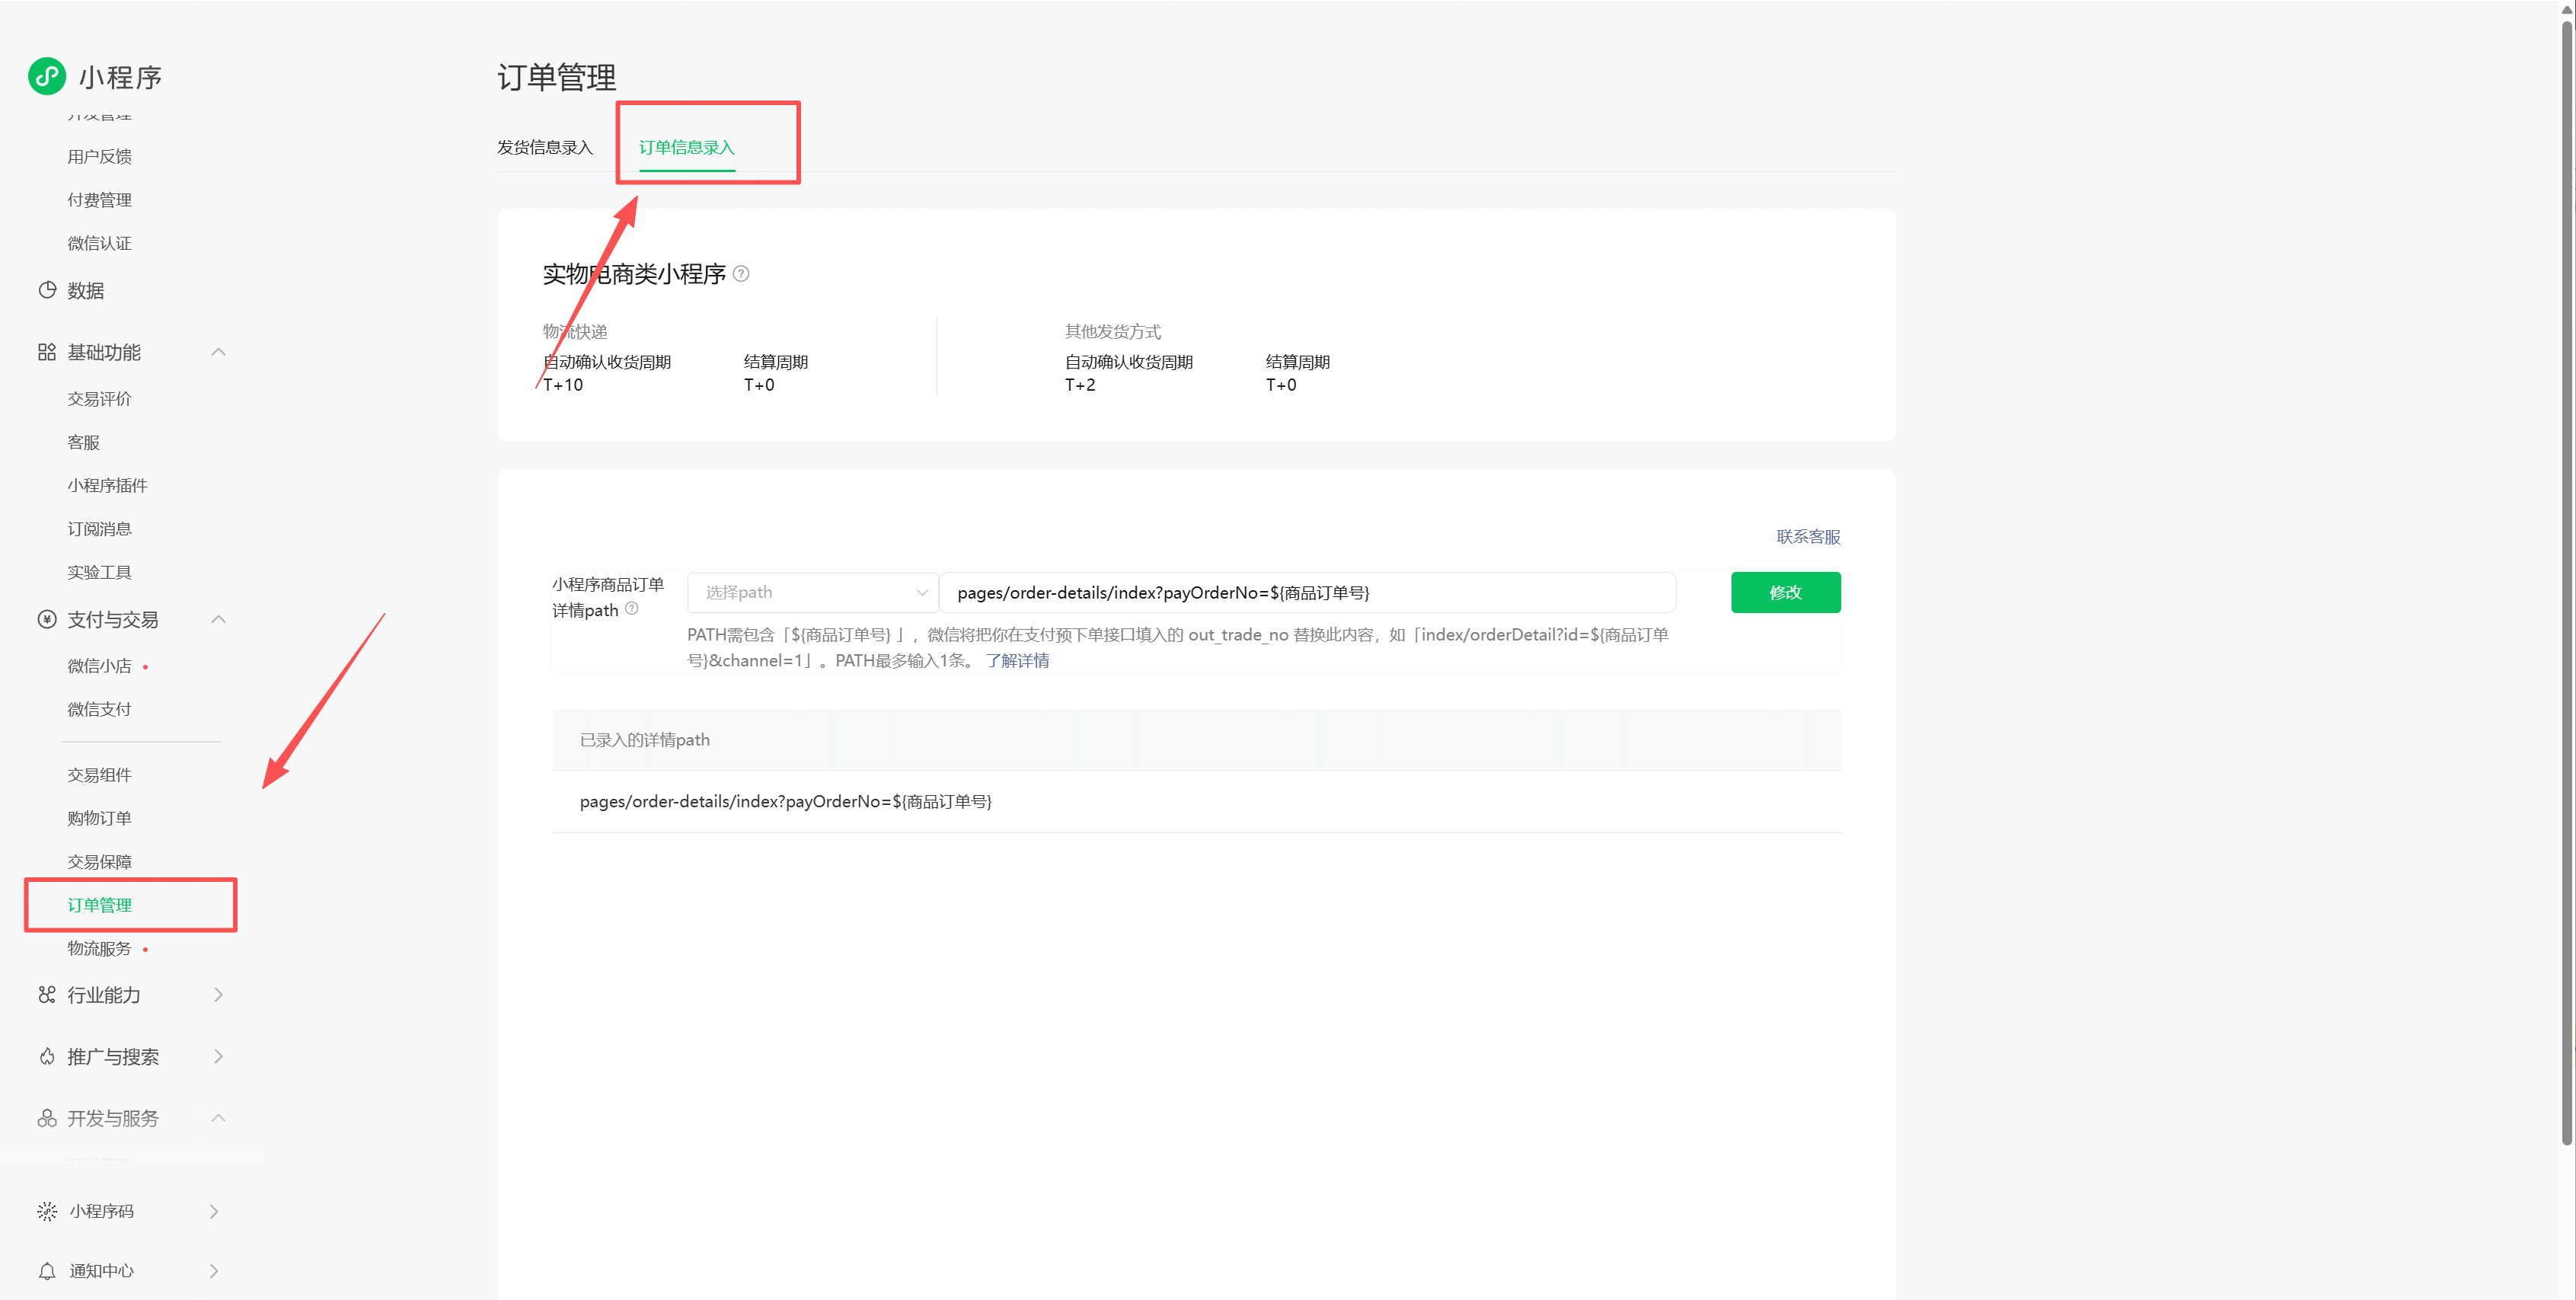
3. Mini program order management -> Order information entry -> Mini program product order details path
**pages/order-details/index?payOrderNo=${item order number}**
Just copy the above exactly and fill it in.
**At the same time, you also need to turn on the switch of synchronizing shipping information to WeChat Mini Program in the "apifm" background, mall management, order settings, and the bottom! !**
4. Officially release your mini program
When logging in to the mini program merchant backend in the "first step", go to "Version Management" on the left menu, find the version that has passed the review, and click Publish Now
##wx.getLocation changed to wx.getFuzzyLocationThe review of WeChat's application for the getLocation interface is strict, and it may be difficult to apply for this interface. You can use wx.getFuzzyLocation instead: [https://developers.weixin.qq.com/miniprogram/dev/api/location/wx.getFuzzyLocation.html](https://developers.weixin.qq.com/miniprogram/dev/api/location/wx.getFuzzyLocation.html)
Development tools, globally replace the following code:
**Need to be replaced 3 times**
`scope.userLocation` replaced with `scope.userFuzzyLocation`
As shown in the picture:
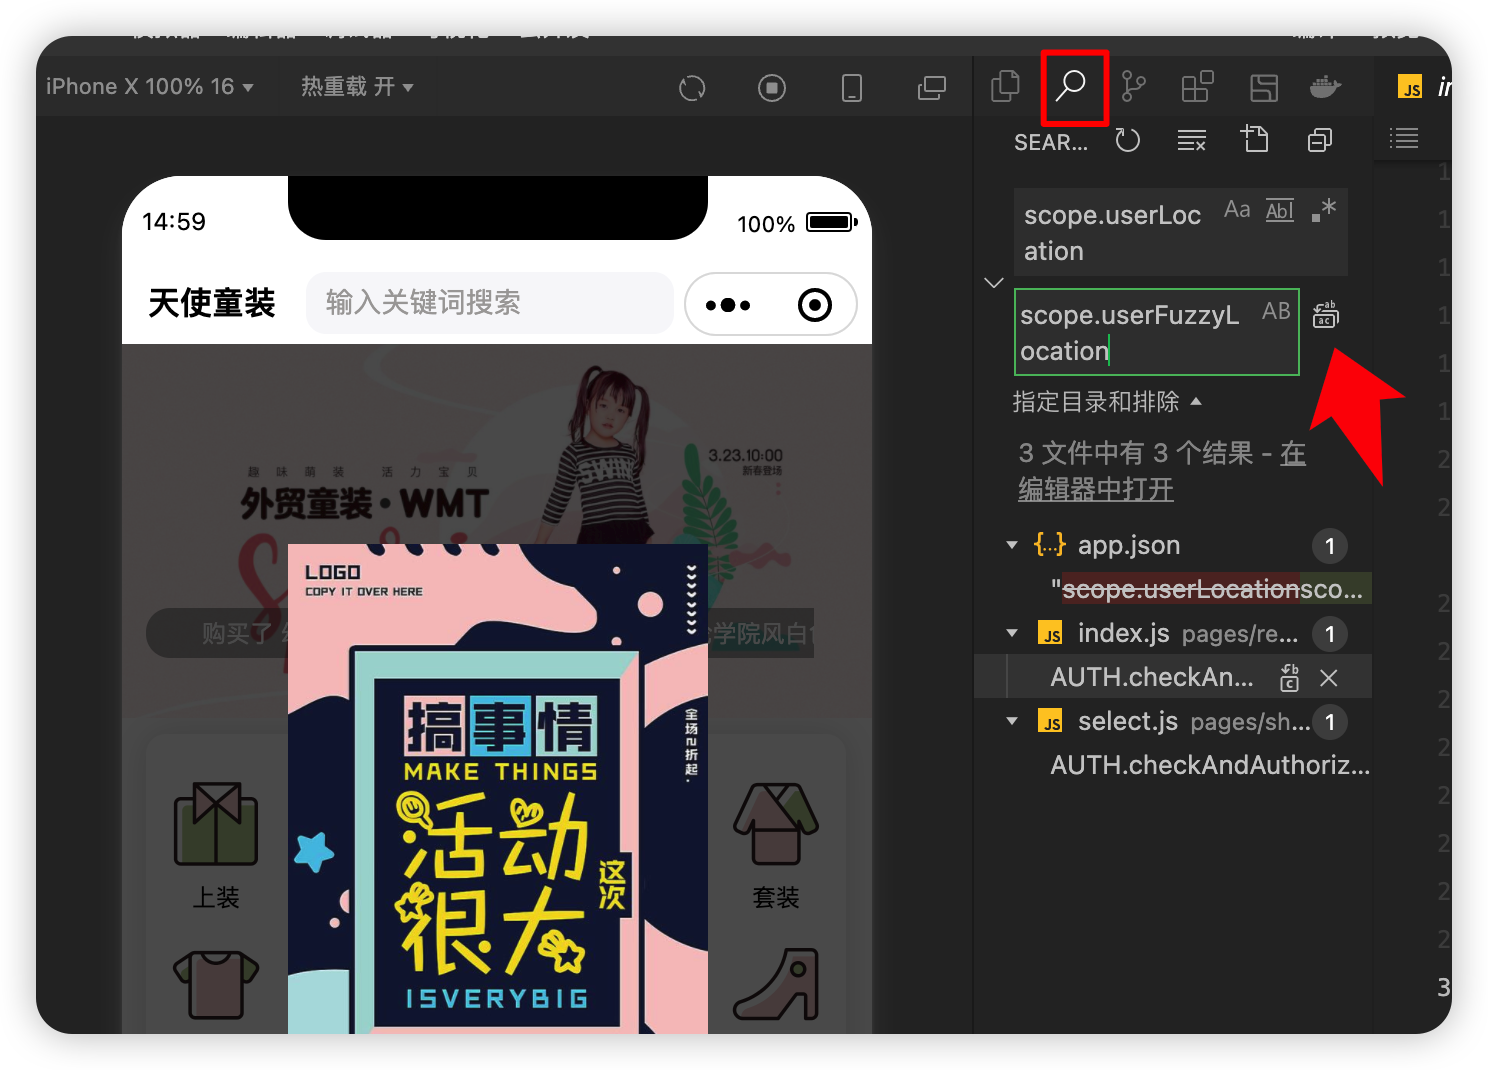
Then replace the code globally:
`wx.getLocation` replaced with `wx.getFuzzyLocation`
Then replace the code globally:
`"getLocation"` is replaced by `"getFuzzyLocation"`
# FAQ
[""regeneratorRuntime is not defined""](https://www.yuque.com/apifm/doc/da0p0c)
["Unable to log in"](https://www.yuque.com/apifm/doc/qgzm02)
["WeChat Payment 50000 Error/Signature Error"](https://www.yuque.com/apifm/doc/nrw662)
["Failed to bind mobile phone number interface"](https://www.yuque.com/apifm/doc/taoc9d)
["Generate product posters/distribution center and go around"](https://www.yuque.com/apifm/doc/gsw6be)
["How to configure subscription messages"](https://www.yuque.com/apifm/doc/sw1dg9)
## `api scope is not declared in the privacy agreement` error:
[https://www.zhuige.com/index/news/detail/id/1902.html](https://www.zhuige.com/index/news/detail/id/1902.html)
## Upload code [getFuzzyLocation] is not authorized
Because you don’t need to apply for the permission of the `getFuzzyLocation` interface:
[https://mp.weixin.qq.com/](https://mp.weixin.qq.com/)
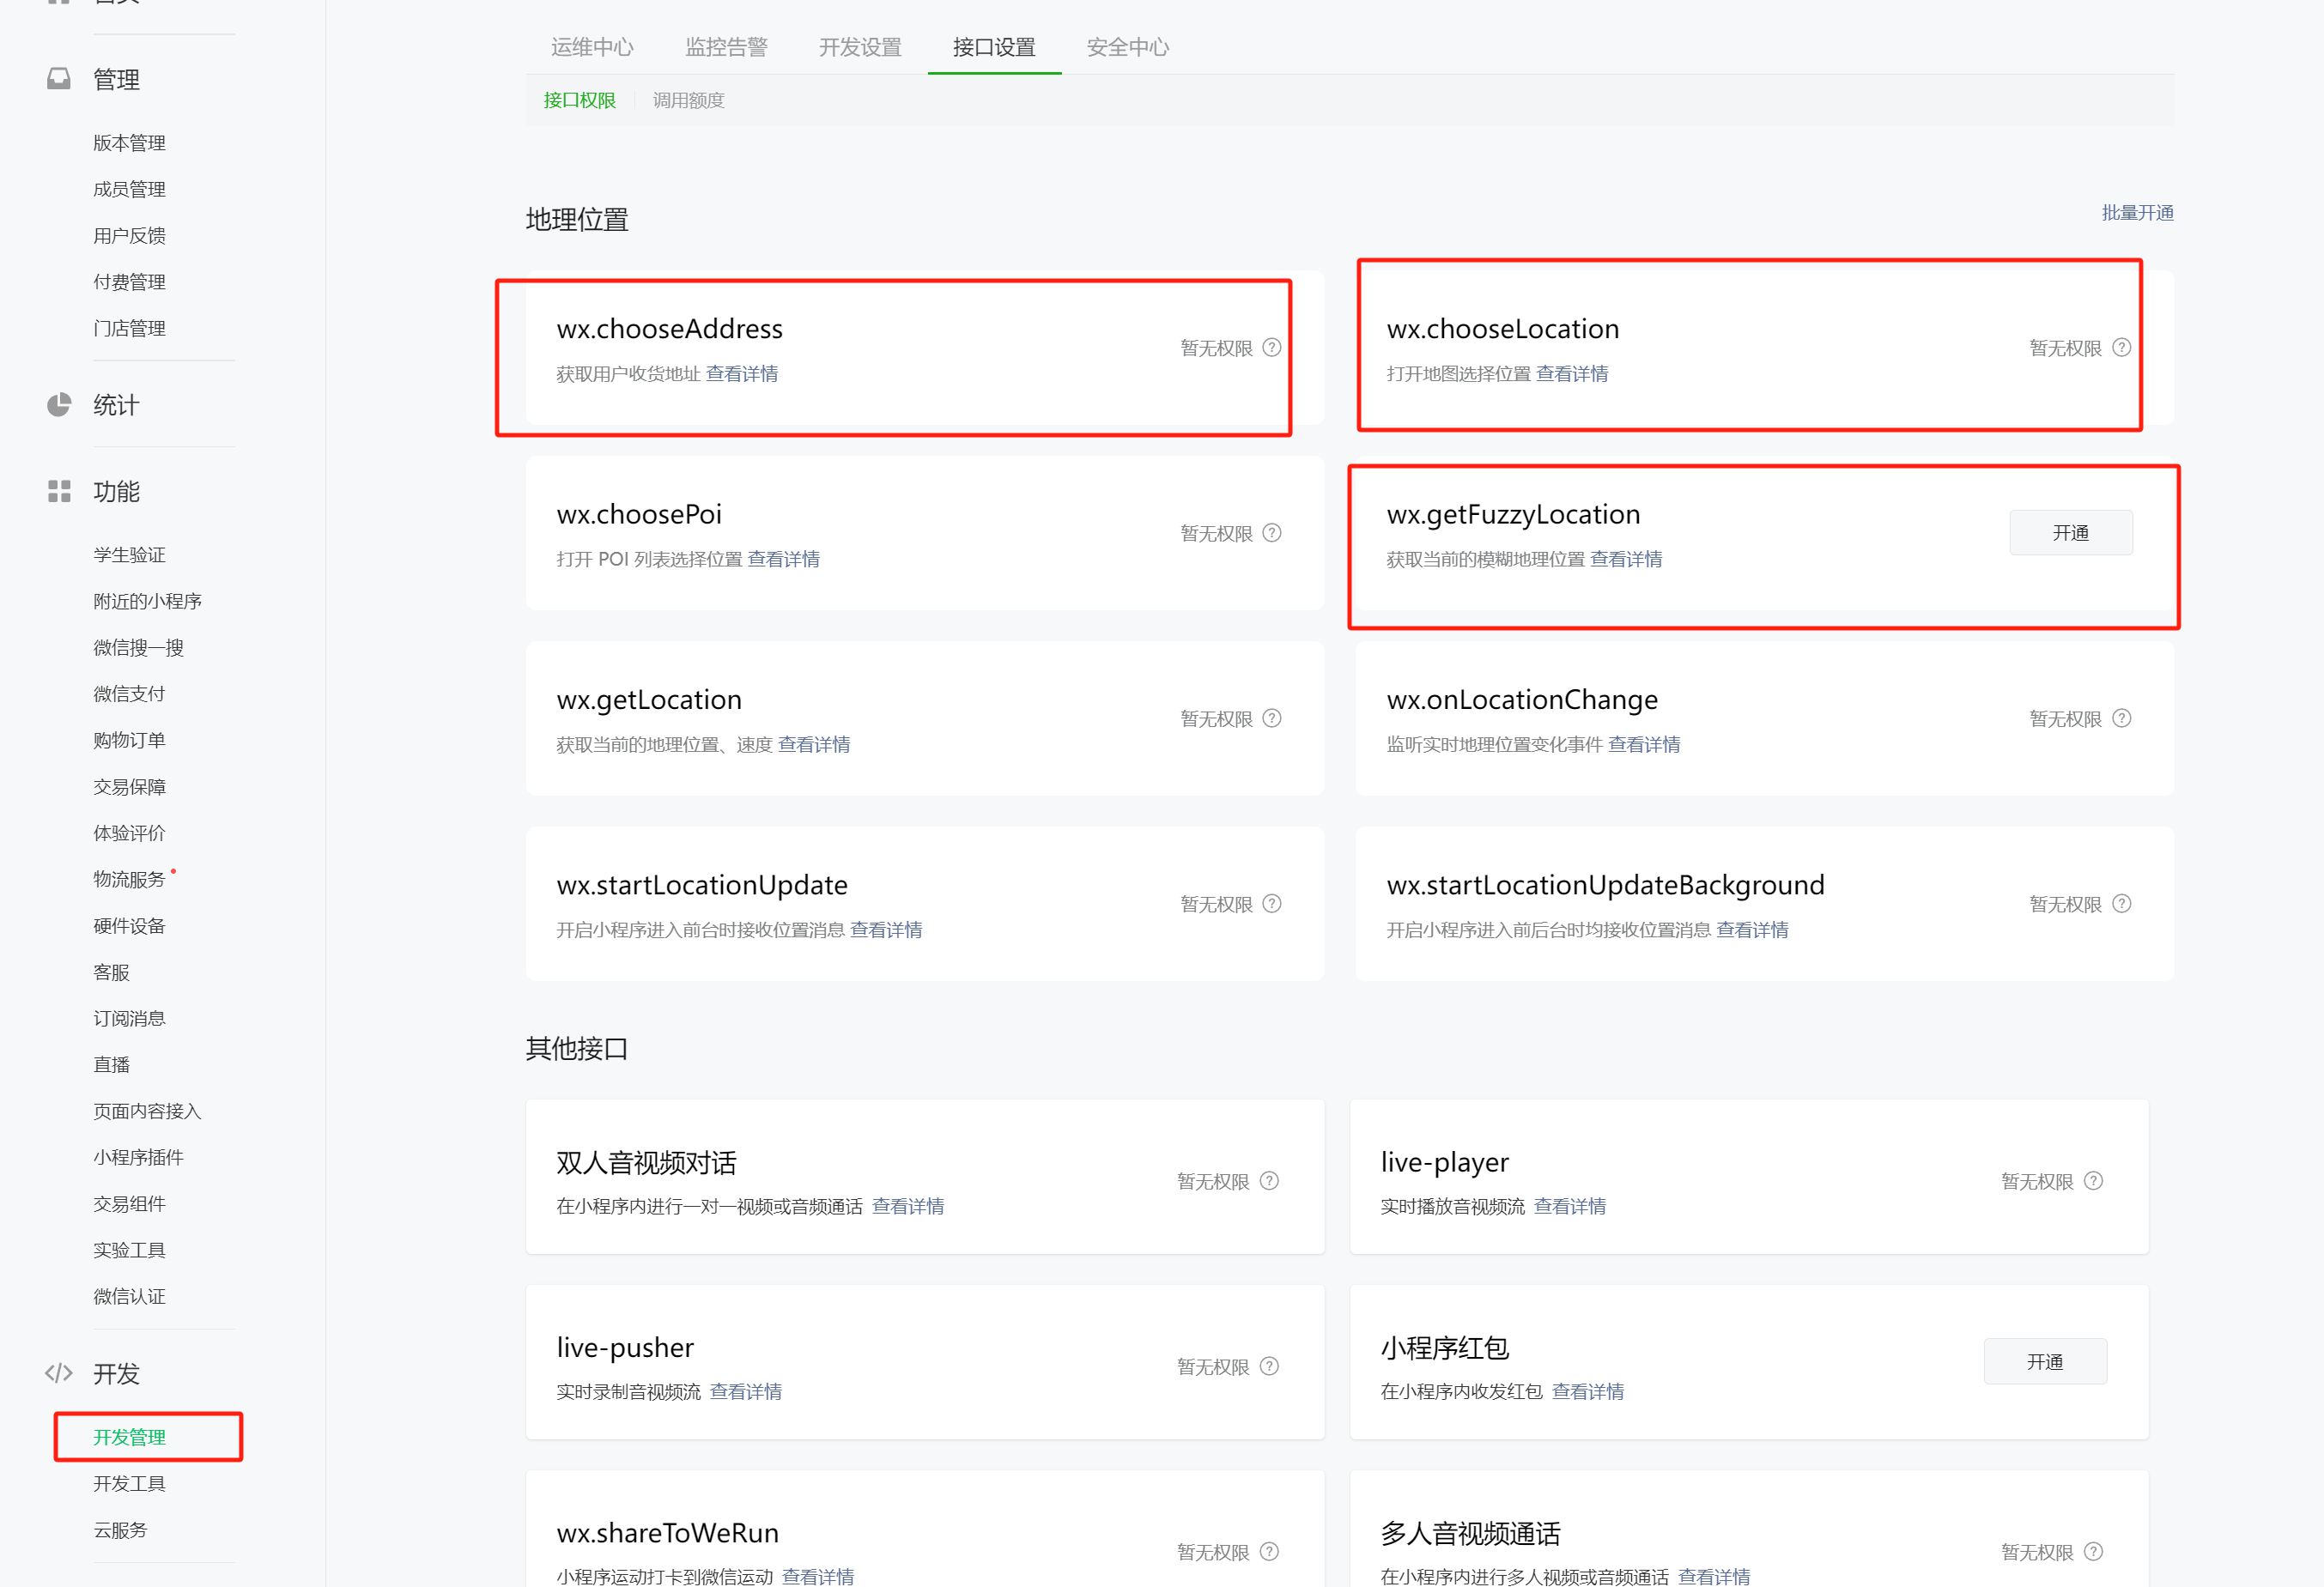
Just apply for permission to open these three interfaces. The reason why the picture above prompts `no permission yet' is because you have not added a category. Click on the avatar in the upper right corner. After the service category is added, you can apply.
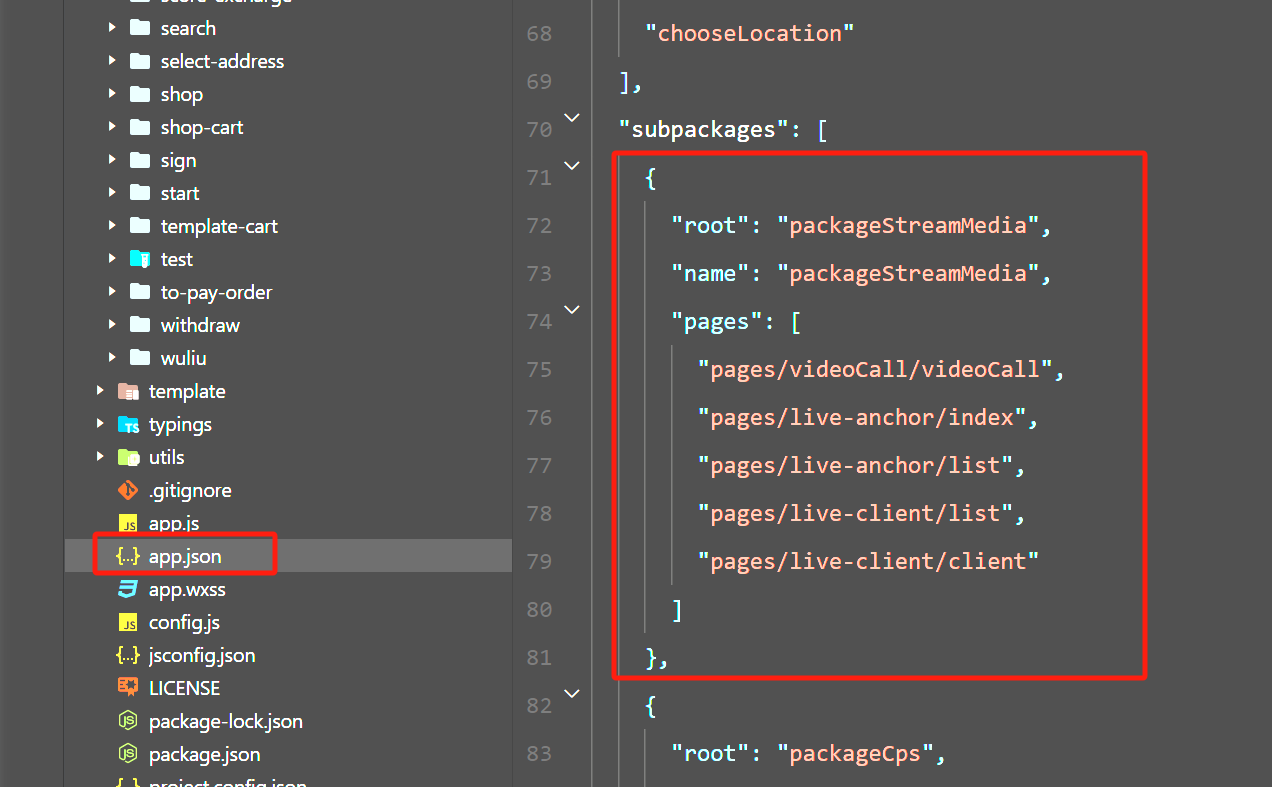
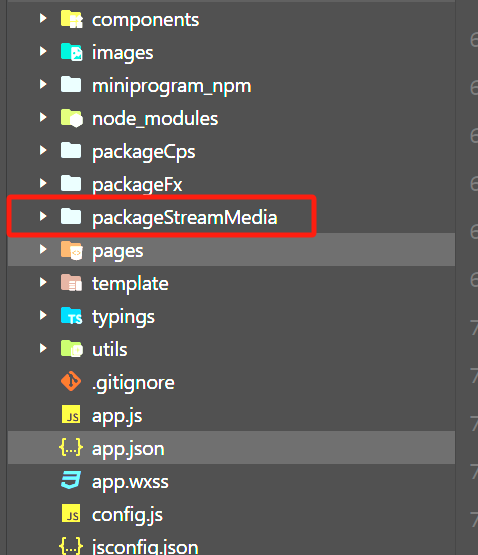
## During the review, it was said that there is a live broadcast service that needs to be deleted.
1. Delete subcontracting from app.json file
2. Delete subpackage folder
## After adjusting the bottom menu, the red number in the shopping cart is displayed incorrectly.
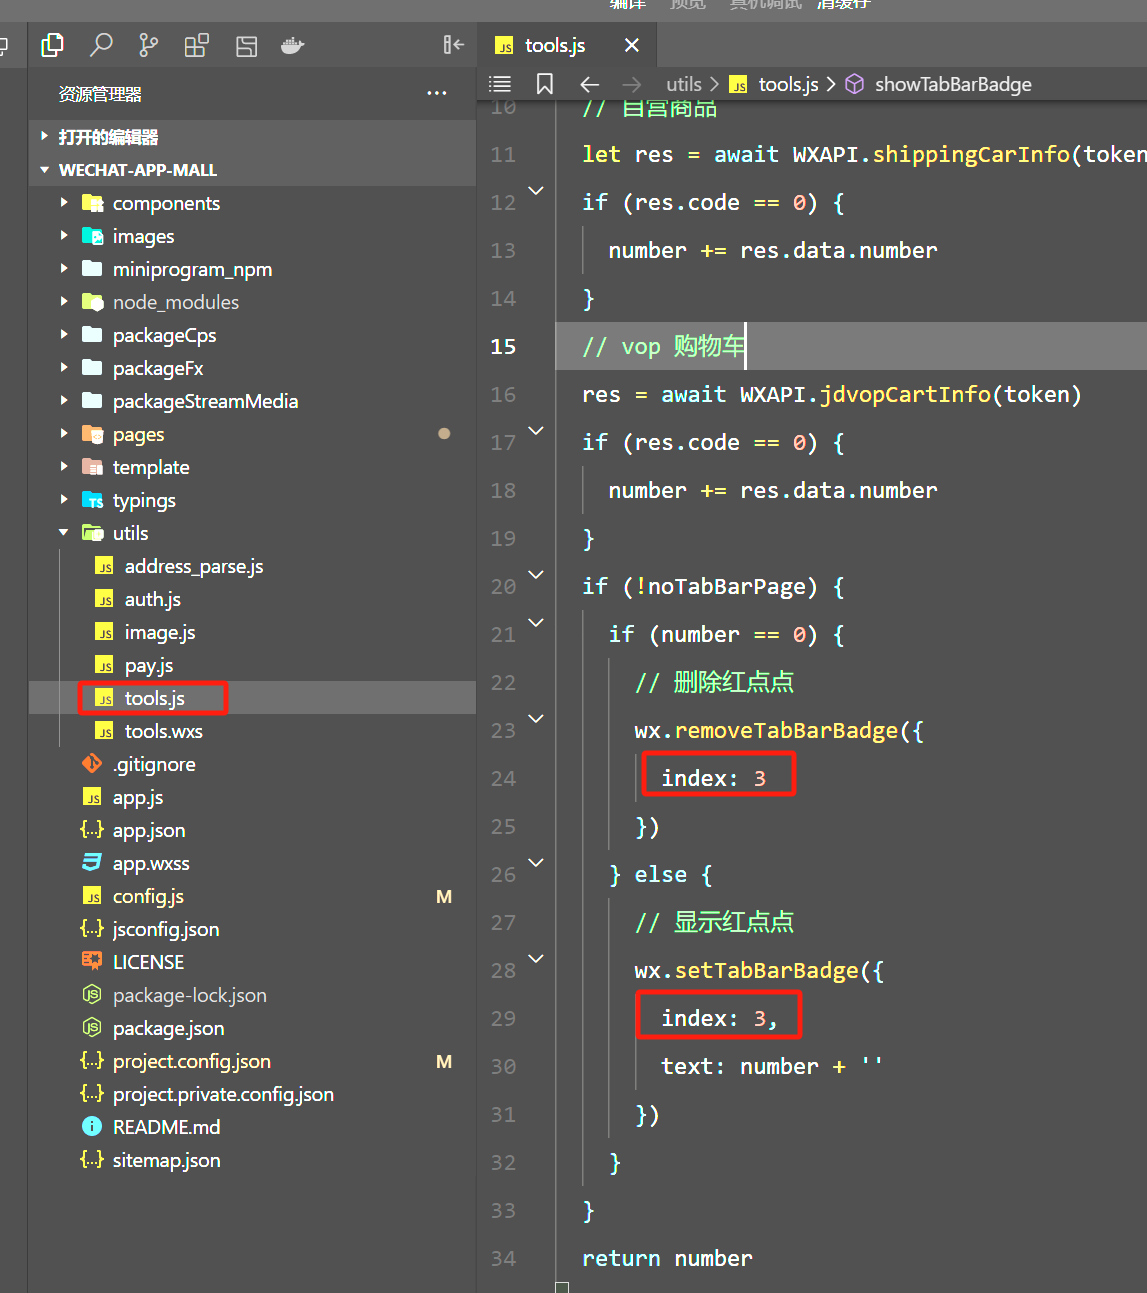
The position of the little red dot is 3 by default, which is the fourth menu at the bottom, because the array starts from 0
## Multiple specifications have been added to the product, and the mini program is not fully displayed.
To add specifications, you need to go through the product list, expand the operation on the right and "Batch Set SKU" to add specifications. If you are editing the product page and add the SKU yourself, this may happen. Please enter the batch setting page, delete the existing SKU information, and re-check to add it.

If you have other questions, please check the "Frequently Asked Questions" on the project homepage.
[https://github.com/EastWorld/wechat-app-mall](https://github.com/EastWorld/wechat-app-mall)
[https://gitee.com/javazj/wechat-app-mall](https://gitee.com/javazj/wechat-app-mall)