# Preface
This tutorial is based on the "apifm-wxapi" module and teaches you how to quickly implement small program development, so you may need to understand the following knowledge points first:
["Creating HelloWorld Project"](https://www.yuque.com/apifm/doc/hezlrm)
["Use "apifm-wxapi" to quickly develop small programs"](https://www.yuque.com/apifm/doc/mdldsd)
["Register for free to open the backend and obtain an exclusive domain name"](https://www.yuque.com/apifm/doc/qr6l4m)
In this case, some functions require the user to log in before they can be operated, which means token authorization is required. Please understand first:
["WeChat Mini Program login to obtain openid and third-party tokens"](https://www.yuque.com/apifm/doc/kaygbw)
# Function introduction
The queuing system can be seen everywhere:
The restaurant has different tables for 2-3 people; tables for 3-5 people; tables for 6-10 people; the restaurant conducts a number queuing, and users can get the number of the designated table according to their own needs and call the number to dine;
Public service halls such as banks will also take numbers according to different businesses (personal business, corporate business, cash business), and special windows will handle designated businesses;
This example will show you a simple way to implement a small program for queuing and calling numbers. Because complex functions such as calling stations and other functions have been completed in the background, the programming of the small program becomes very simple!
# enable module
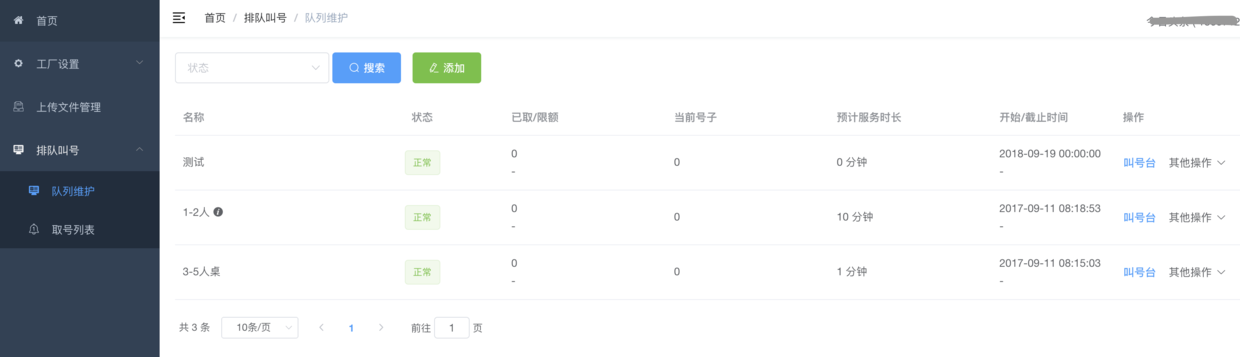
Log in to the "First Step" registration background, left menu --> Factory settings --> Module management
Find and enable the following modules, then press F5 to refresh the background interface. You will be able to see all the function menus required for this case:
1. Queuing system
_The menu in this case is "Queue Plus Number" --> "Queue Maintenance" + "Take Number List" 2 menus_
# apifm-wxapi method description
### Get all queues
```javascript
WXAPI.queuingTypes(status)
```
> Get all calling queues
>
> The status parameter represents (0 normal 1 closed 2 quota is full), if this parameter is not passed, all queues will be obtained
>
_For example, in catering: tables for 2 people, tables for 4 people, and large round tables; these three queues are called independently. Users can go to the corresponding queue to get a number and line up according to their actual situation; _
_Another example is the queues in the bank service hall: personal business, corporate business, and cash business; these three queues are also called independently;_
### Get a number
```javascript
WXAPI.queuingGet(token, typeId, mobile)
```
> Users need to log in before they can get a number, so please provide the correct token
>
> typeId is the ID of the queue you want to get the number from. Please obtain it according to the above method.
>
> mobile is the mobile phone number for calling the number, which is optional. You can then push queue progress and queue reminders to this mobile phone number.
>
### My number retrieval status
```javascript
WXAPI.queuingMy(token, typeId, status)
```
> typeId is the ID of the queue you want to get a number from. If you don’t pass it, you will get the number information from all queues.
>
> status represents (0 Queuing 1 Accepting 2 Processed 3 Passed) If this parameter is not passed, all the number records will be read.
>
# Mini program development
## Effect screenshot

## Mini program code
### wxml file
```html
```
### js file
```javascript
const WXAPI = require('apifm-wxapi')
Page({
data: {
queuingTypes: undefined
},
onLoad: function (options) {
WXAPI.queuingTypes().then(res => {
if (res.code == 0) {
this.setData({
queuingTypes: res.data
})
}
})
},
goRegist() {
wx.navigateTo({
url: '/pages/auth/index'
})
},
queuingGet(e){
const loginToken = wx.getStorageSync('loginToken')
if (!loginToken) {
wx.showToast({
title: 'Please log in first',
icon: 'none'
})
this.goRegist()
return
}
const typeId = e.currentTarget.dataset.id
WXAPI.queuingGet(loginToken.token, typeId).then(res => {
console.log(res)
if (res.code == 0) {
wx.showToast({
title: 'Number taken successfully',
icon: 'success'
})
} else {
wx.showToast({
title: res.msg,
icon: 'none'
})
}
})
},
queuingMy(){
const loginToken = wx.getStorageSync('loginToken')
if (!loginToken) {
wx.showToast({
title: 'Please log in first',
icon: 'none'
})
this.goRegist()
return
}
WXAPI.queuingMy(loginToken.token).then(res => {
console.log(res)
wx.showToast({
title: 'Please see the console output',
icon: 'success'
})
})
}
})
```
_More usage methods about apifm-wxapi: _
["apifm-wxapi Instructions for Use"](https://github.com/gooking/apifm-wxapi/blob/master/instructions.md)
_Download the Demo code of this case: _
["apifm-wxapi using Demo program"](https://github.com/gooking/apifm-wxapi-demo)
Looking forward to your progress!
grateful!